- Preliminaries
- Lectures
- Tutorials
- Text Books
- Programming Language
- Project
- Tools
- Forming Teams
- Peer Evaluations
- Exams
- Grade Breakdown
- Participation Marks
- Appendix A: Module Principles
- Appendix B: Module Policies
- Policy on following instructions
- Policy on grading smaller/larger teams
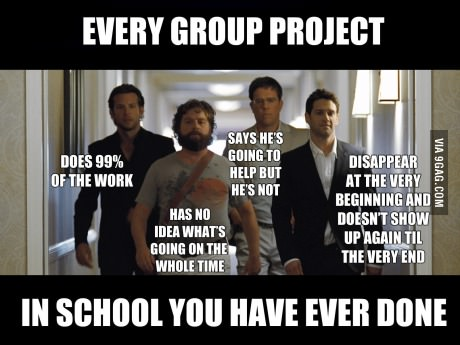
- Policy on project work distribution
- Policy on absence due to valid reasons (e.g. MC, LOA, University events)
- Policy on email response time
- Policy on tech help
- Policy on publishing submissions
- Policy on plagiarism
- Policy on reuse
- Policy on help from outsiders
- Policy on suggested length for submissions
- Appendix C: Frequently Asked Questions
- Why the workload is so high?
- Why so much bean counting?
- Why you force me to visit a separate website instead of using IVLE?
- Why slides are not detailed enough, handouts are wordy?
- Why so much self-study?
- Why do I have to come to tutorials on time?
- What if I don’t carry around a laptop?
- Why very narrow project scope?
- Why project requirements are so vague?
- Why I’m not allowed to use my favorite OS/IDE/etc?
- Why so many submissions?
- Why not enough marks for intermediate submissions?
- Why submission requirements differ between CS2103T and CS2101?
- Appendix D: How to get help in CS2103/T
- Appendix E: Using GitHub Project Hosting
- Appendix F: What to do if there are teamwork issues
Preliminaries
Where is everything? CS2103/T-related information are mainly in one of these two places:
- The Schedule page (organized chronologically): That is the one page you need to refer weekly.
- Module handbook (i.e. this page. organized by topic) This is a reference document supplementary to the schedule page. This page contains a lot of text, probably too much to read in one sitting. Instead, skim through it quickly to learn what it contains. You can come back to read details as-and-when the need arises. The schedule page lists relevant sections of the Handbook you should read at various points.
No reminder emails: We try to minimize sending module details via announcements. The reason will be explained in lecture 1.
CS2103 Vs CS2103T: Same lectures, same exam. Separate tutorials, separate project grading. Unless specified otherwise, whatever is stated for one module applies to the other.
What did seniors say about this module? CS2103/T is practical and useful module, but also a heavy and intensive module, as you can see from student feedback for a recent offering of the module.
Lectures

Timing/venue: Fri 1400-1600 ICube Auditorium. Lectures start at 1400 sharp and end around 1545 (15 minutes to travel to next lecture).
Attendance: Attendance for the first lecture is compulsory.
Webcast: All lectures will be webcast. However, some things are not captured well in the webcast recording. You are advised to treat the webcast as a 'backup' for you to catch up anything missed during the lecture.
Handouts: Each lecture consists of 3-5 sections, supported by separate handouts. Links to handouts for a lecture will be added to the Schedule page on Wednesday of that week. You are welcome to, but not required to, read through them before attending the lecture.
Read before tutorials: You are required to read the relevant handouts and ponder how to apply those concepts in your project before attending the corresponding tutorial. If you have any followup questions about handouts, please post in IVLE forums or ask during tutorials (if there is spare time).
Post-lecture quizzes: Each lecture will be followed by an IVLE quiz that can earn you participation points. Purpose: for you to self-test how well you understood the handouts and other “required” readings (if any). You can keep taking the quiz until you get full marks. We count the best effort only. IVLE quizzes open on Friday right after the lecture and closes on the following Tuesday 2359. Post-lecture quizzes are counted for participation marks.
Slides: Because we are giving separate handouts, lecture slides do not contain content that you can print and use as a reference during the lecture or the exams. Instead, handouts serve as the main exam reference while slides will play only a supporting role during lecture delivery. Slides will be uploaded after the lecture.
Tutorials
IMPORTANT: Our tutorials start on week 2 (even before CORS tutorial bidding is over), not in week 3 as other modules do. CS2103 (not CS2103T) students need to choose a temporary tutorial slot for week 2 tutorial. We'll inform you the procedure to do so in due course.
The structure of our tutorials is different from traditional tutorials.
- 50% assessment/feedback: Up to 50% of our tutorial time is to be spent on interacting with your tutor as directed by the tutor. The purpose of this interaction is for the tutor to assess learning activities you claim to have done and give you feedback.
- 50% discussion: The remaining 50% of the tutorial time is to be spent on discussing module activities with team members and helping each other w.r.t. those activities.
The role of our tutors is different from tutors in other modules.
- No direct tech help: Tutors are prohibited from giving technical help, because we want you to learn the vital survival skill of troubleshooting technical problems.
[cf Appendix D: How to get tech help] - No ‘teaching’: Tutors are prohibited from “teaching” concepts that are covered in lectures or handouts. Self-learning is a vital part of the module. But tutors may help you clarify doubts. For example consider these two questions
you might want to ask a tutor:
- This is how I understood/applied dependency injection. Is that correct? - Such questions are welcome.
Reason:This question shows you have put in some effort to learn the topic and seeking further clarification from the tutor. - What is dependency injection? - Such questions are not welcome.
Reason: This question implies you haven’t done what you could to learn the topic in concern.
- This is how I understood/applied dependency injection. Is that correct? - Such questions are welcome.
No leading from the front: Tutors are not expected to lead your project effort. They will not tell you how to do project tasks or when to do project tasks. You have to figure those out yourselves. But tutors will give you feedback
on how you are doing (or have done) project tasks so that you can improve further.
[Cf external resource: A practitioner article about receiving feedback]
Timing/venue:
- Please refer to the Schedule page for further details on each tutorial.
- You are expected to arrive on time.
- If your tutorial is in COM1-B103: If you arrive early, you may enter the tutorial room by the door near the staircase and wait in the empty area of the room until the current class vacates the room.
- If your tutorial is in SR5: If you arrive early, please wait outside the room until you are asked to come in.
- You may leave the class 15 minutes before the hour if you have another class right after. There is no need to wait till the tutor dismisses you. However, inform the tutor before leaving if you leave before the class is dismissed.
- Please make sure you vacate the table 5 minutes before the hour so that the next group can start on time. You may move to the empty area at the back of the room and continue your discussions after the class is over.
- In the past many students have suggested to increase the tutorial duration because 1 hour is barely enough to get through all the tutorial tasks. Increasing the tutorial time is not possible due to lack of venues and tutors. What you can do is to extend the tutorial time by yourselves. e.g. Meet 30 minutes before the tutorial starts and prepare yourselves for the tutorial task. Similarly, you can move your discussion to somewhere else after the tutorial is over and continue for some more time.
Learning activities:
Each tutorial has a list of learning activities. They are categorized as,
- BASIC (⭐️) : Cover skills you should have if you want to PASS the module.
- INTERMEDIATE (⭐️⭐️) : Cover skills you should have if you are aiming for a GOOD grade from this module, and a good career as a software engineer.
- ADVANCED (⭐️⭐️⭐️) : Cover skills beyond the module syllabus. These are for students who want to go the extra mile to strengthen their skills.
Grading:
The following aspects of your conduct in tutorials will be considered when awarding participation marks. Grading is based on peer evaluations and tutor observations. Cf handbook section: Participation marks
- Punctuality: Arrived on time. Stayed in the tutorial at least 40 minutes.
Cf FAQ: Why do I have to attend tutorials on time? - Attention: Paid undivided attention to tutorial proceedings (i.e. no multi tasking). Took part in tutorial activities.
Note: When the tutor is discussing something with one team member (e.g., one team member is explaining how he/she used assertions), the whole team is expected to pay attention to that discussion, not do your own things. Whatever discussed is relevant to all of you, not just that team member. - Effort: The amount of learning activities done before and during the tutorial.
Other expectations:
- Please bring your laptop to tutorials. You often need it to show your learning activity results. At other times, we ask you to work on project related things with your team members, which too may require the laptop. Cf FAQ: What if I don't carry a laptop around?
Text Books
There is no need to buy a textbook this semester. Lecture handouts should be enough to give you the required coverage of our topics.
Here are some relevant books you can read to supplement module content (optional reading).
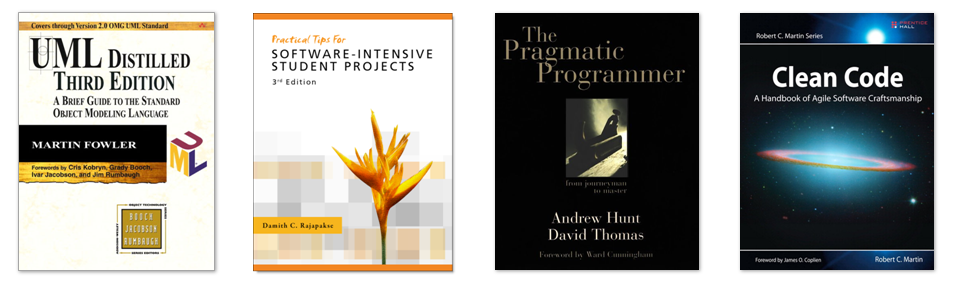
- UML Distilled by Martin Fowler
- Practical Tips for Software-Intensive Student Projects by Damith C. Rajapakse
- The Pragmatic Programmer by Andrew Hunt and Dave Thomas
- Clean Code by Robert C. Martin
Programming Language
 |
The main language used in this module is Java. You should use Java for all programming activities, the project, and exam answers. The module doesn’t “teach” Java. We assume you already know Java basics. We expect you to learn on your own any Java constructs not covered in your previous modules. Our Java coding standard is here. |
Project
CS2103 project is structured to resemble the initial stages of a non-trivial real-life software project. In this project you will conceptualize a product and build a scaled-down version of the product, and have it ready to be continued by someone else.
The product
In this semester, we build a scaled-down version of ‘a Siri for keyboards’. i.e. a tool that can accept natural language commands via keyboard. This is for folks who can type fast, spend most of the time near a computer, and prefer typing over mouse/voice commands.
It is ‘scaled down’ in the following ways:
- It handles only commands related to managing the user's schedule and todo tasks.
- The commands will not be truly ‘natural language’. The command format will be flexible, but still quite structured. NLP (Natural Language Processing) is not required.
Let us use the generic term 'Task Manager' to refer to this product. You should give it a different name yourself.
Problem outline: We are bombarded with ‘things to do’ continuously. Some things need to be done during specific times (e.g., attend meeting), some have deadlines (e.g., submit report), and others are simply ‘to be done someday’ (e.g., read ‘Lord of the Rings’). The pile of todo items accumulates and weighs heavily on our mind at times. Sometimes things go out of control and we forget to do certain things on time.
Solution outline: The software should help user to put these todo items into a systematic process that tracks them and helps the user to decide what to do and when to do things so that the user doesn’t have to remember the todo items.
Target audience: There are many similar software that tackles some aspect of this problem (todo lists software, calendar software, GTD software). Because it is a crowded product space, our strategy is to become a niche player by targeting a specific user group. Our target users are people like Jim whose workflow is described below.
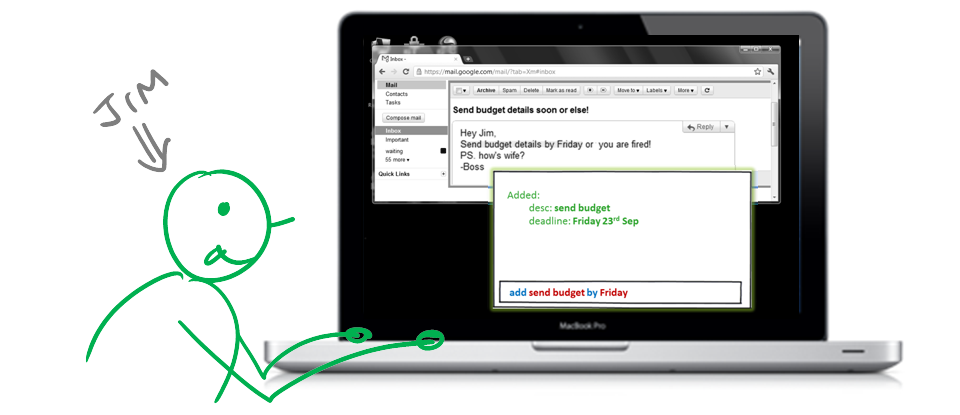
Most of Jim’s todo items arrive as emails. This is how Jim processes his emails.
-
Decides what is the follow up action required by that email.
- If it can be done immediately, he does it right away (e.g., just reply to the email) and ‘archive’ the email (i.e. move it out of inbox).
- If it cannot be done immediately, he schedules the follow up action in his calendar and archives the email. If he cannot decide a good time to do the action, he simply schedules it in a relatively free area in his calendar.
-
When Jim is free to do some work, he looks at his calendar and picks up something that he can do at that time. Once the task is done, he marks it as ‘done’. If there is a further follow up action required, he schedules it in the calendar.
-
Jim periodically reviews the calendar to pick items that could not be completed and need to be rescheduled or discarded as ‘cannot do’.
-
Todo items not arising from email are dealt similarly by entering them in the calendar.
As you can see from the above workflow, Jim’s inbox is almost empty most of time (cf Inbox Zero). He no longer worries about an inbox full of emails he has to deal with at any time he login to email. He also does not have to keep any todo items in his mind because everything is recorded somewhere. However, here are some ‘pain points’ in his workflow.
- Jim is currently using Google calendar. Because he stores/retrieves/edits todo tasks so frequently, he finds the online calendar too slow to work with. He’d rather have a desktop software he can summon quickly. Even better (but not a must) if he can activate the software by pressing a keyboard shortcut. He is quite impressed by how the Launchy tool can be activated easily by pressing Alt+Space.
- A calendar is not very good in capturing tasks that need to be done before a specific date/time, or after a specific date/time, and items without specific times.
- Entering an event in a calendar is a pain because it takes several clicks. He prefers a ‘one shot’ approach. e.g., to be able to type in commands such as "
add July 10, 5-6, project meeting" (such as allowed by GCal’s ‘quick add’ feature). - While it is good that all Jim’s todo items are currently online and available to access from any computer, he always uses his own laptop or office PC to access them and sometimes from places where there is no ready Internet connectivity.
- Jim finds it a pain to do certain things important to his workflow but not so important in a regular calendar. e.g. looking for suitable slot to schedule an item, marking an item as done, deciding what todo item to do next, postponing an item.
- A calendar does not have an easy way to “block” multiple slots when the exact timing of a task is uncertain, and release the blocked slots when the time is finalized. e.g., Block Mon 2-3pm and Tue 2-3pm for a meeting with boss → the meeting is confirmed for Tue → automatically release Mon slot.
Design your product to solve some of Jim’s problems to make his workflow even more efficient and painless. i.e. to make his life better. You don’t have to solve all problems mentioned above and there may be other problems you could solve but not mentioned above. Good software delights users by solving problems users don’t even realize they have.
Important:Command Line Interface is the primary mode of input. The GUI is primarily for output. That is, the GUI is used to give visual feedback rather than to collect input. Some minimal use of mouse is OK (e.g. to click the minimize button), but the primary input should be command-driven. Mouse actions should have keyboard alternatives and typing is preferred over key combinations. Design the app in a way that you can do stuff faster by typing compared to mouse or key combinations.
Project Scope
The scope of the project will be restricted. This is to reduce your workload and discourage an ‘arms race’ where you try to implement as many features as possible with no time to spend on learning good software engineering principles and practices.
Write the software to cater to Jim. He is an office worker who has an office computer (used when at office) and his personal laptop (used when at home or travelling). His computers are not shared by other colleagues or family members. He is not expected to use this software for collaborative work scheduling with others.
Narrowing/widening the scope of the project further is discouraged.
Must-have features:
- Support for events (i.e., has a start time and end time), deadlines (tasks that have to be done before a specific deadline), and floating tasks (tasks without specific times). Note that these category names are temporary names only. You should figure out what are the best names for these categories. Are these names intuitive to end-users? Should they even care about consciously categorizing tasks?
- CRUD (i.e., Create, Read, Update, Delete) support for tasks.
- Undo operations (at least for the most recent action)
- Some flexibility in the command format: Support a few natural variations of the command format.
- Simple search: A simple text search for finding an item if the user remembers some keywords from the item description.
- Some way to keep track of which items are done and which are yet to be done.
- The ability to specify a specific folder and a file for data storage. With this feature, Jim can choose to store the data file in a local folder controlled by a cloud syncing service (e.g. dropbox), allowing him to access task data from multiple computers.
Nice to have features : (you may implement 0 or more of these features)
Difficulty-low
- AutomatedTesting : Achieve a very high level of automated testing.
- RecurringTasks: Support for managing recurring tasks. e.g. CS2103 lectures are a recurring task from week 1 to week 13 except in recess week.
Difficulty-medium
- PowerSearch : More powerful and intelligent search. e.g. search for empty slots, near-match search, auto-complete (similar to Google search box), filters for other attributes (e.g. start time).
- FlexiCommands: High flexibility in command format. e.g., non-strict ordering of keywords, ability to specify aliases for commands, support for more ‘natural’ language input, multiple undo/redo, How flexible should the format be? As flexible, intuitive, and user-friendly as you can make it.
Difficulty-high
- GoodGui: A good GUI to give visual feedback to the user e.g., in-built guidance for new users, good visual feedback for actions, feedback while typing commands, hotkey to activate/hide, notifications, etc. conveying more information visually (e.g. more important/urgent tasks stand out from the rest, longer events look different from shorter events, easy to see free slots, etc.)
- GoogleIntegration: Google Calendar integration. e.g. upload todo items to GCal, two-way sync, Support for GCal quick add command format, etc. You may also use the Google Tasks API for this.
You can also propose your own extra features(subject to approval). Note that each student must implement at least one feature individually (in addition to features implemented collectively with other team members) and the average amount of code one member is expected to write for the project is 0.5-1.5 KLoC. Reason: Each student must learn all parts of the code and write a significant amount of code.
Adding more features may not necessarily increase your score as half-baked features, ill-fitting features, and buggy features will bring your score down.
Project Constraints
You should also comply with the following constraints. The purpose of these constraints is to increase comparability among submissions and to maximize applicability of module content in the project.
-
Constraint-Morph: The final product should be a result of morphing the given sample code. i.e. enhance and/or evolve the given code to arrive at the new software.
Reason: To ensure your code has a decent quality level from the start. -
Constraint-Desktop: The software should be a desktop app (i.e. not a Mobile or a Web app). Reason: Desktop apps are more general than other platforms such as mobile/embedded/web and therefore, provides a good starting point before you move to those platforms.
You are allowed to integrate with online services such as Google Calendar as long as the app can provide a reasonable level of functionality even when offline. -
Constraint-CLI: Command Line Interface is the primary mode of input. If you implement a GUI, it should be primarily for output. That is, the GUI is used to give visual feedback rather than to collect input. Some minimal use of mouse is OK (e.g. to click the minimize button), but the primary input should be command-driven. Mouse actions should have keyboard alternatives and typing is preferred over key combinations. Design the app in a way that you can do stuff faster by typing compared to mouse or key combinations.
-
Constraint-Standalone: The software should work stand-alone. It should not be a plug-in to another software. However, you can build optional extensions that integrate your application with other existing software. Furthermore, you are allowed to build extensions that can plug into your software.
-
Constraint-No-Database: The software should not use relational databases. Data storage must be done using text files you create yourself.
Reason: Using relational databases reduces the scope for applying Object-oriented techniques. -
Constraint-Human-Editable-File: The data should be stored locally and should be in a human editable text file. The intention of this constraint is to allow advanced users to manipulate the data by editing the data file.
-
Constraint-OO: The software should follow the Object-oriented paradigm.
Reason: For you to practice OOP that you learned in the course. -
Constraint-Windows: The software should work on the Windows 7 or later.
-
Constraint-No-Installer: The software should work without requiring an installer. Having an optional installer is OK as longs as the portable (non-installed) version has all the critical functionality.
Reason: We do not want to install all your projects on our testing machines when we test them for grading. -
Constraint-External-Software: The use of third-party frameworks/libraries is allowed but only if they,
- are free.
- do not require any installation by the user of your software.
- do not violate other constraints.
and subject to prior approval by us. We will not allow third-party software that can interfere with the learning objectives of the module. Please post your request for approval in IVLE forum before you start using the library. Reason: The whole class should know which external software are used by others so that they can do the same if they wish to.
Project Deliverables
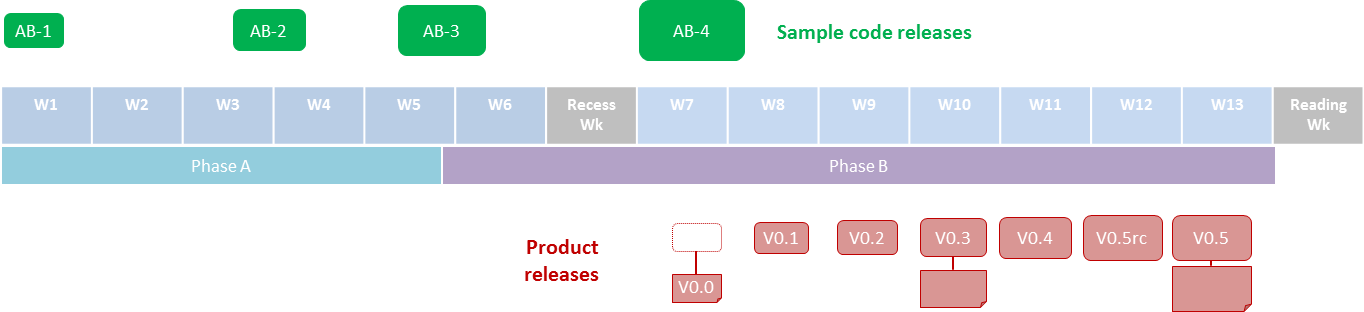
To expedite your project implementation, you will be given some sample code (AddressBook-Level1 to AddressBook-Level4, shown as AB-1 to AB-4 in the diagram above) that you can use as the basis for improving your individual
skills during Phases A and as the basis for your project in Phase B.
The sub-sections further down explain each project deliverable in detail.
V0.0 : The Concept
The objective of this deliverable is for you to analyze requirements, conceptualize the product, and document it.
Step 1 : Brainstorm user stories

Get together with your team members and brainstorm user stories for the product.
- e.g.
As a user I can add a task by specifying a task description only, so that I can record tasks that need to be done ‘some day’.As a user I can find upcoming tasks, so that I can decide what needs to be done soon.As a user I can delete a task, so that I can get rid of tasks that I no longer care to track.As a new user I can view more information about a particular command, so that I can learn how to use various commands.As an advanced user I can use shorter versions of a command, so that type a command faster.
Note how the story covers who (the user), what (the functionality) and why (the value) aspects. - It is ok to have more user stories than you can deliver in the project.You should have at least 30 user stories. Include all 'obvious' ones you can think of but also look for 'non obvious' ones that you think are likely to be missed by other teams.
- Write each use story in a piece of paper (e.g. yellow sticky note, index card, or just pieces of paper about the size of a playing card). Alternatively you can use an online tool such as Trello for recording the initial collection of user stories.
- Note that you should not 'evaluate' the value of user stories while doing the above. An important aspect of brainstorming is not judging the ideas generated.
Step 2: Prioritize the user stories

Suggested workflow:
-
Take one use story at a time and get team member opinions about it.
-
Based on the team consensus, put the story (i.e. the piece of paper) onto one of these three piles:
Must-Have: The product will be practically useless to Jim without this feature.Nice-To-Have: Jim can benefit from this user story significantly but you are not certain if you'll have time to implement it.Not-Useful: No significant benefit to Jim.
-
After all stories have been put in the above three piles, you can make a record of which stories are in the three piles.
Here are some tips to improve the effectiveness of the above activity:
- Define Jim:
Decide our target user Jim's work patterns. e.g. Does he work in groups or alone? Does he share his computer with others? (answer: no). Having a clear picture of Jim's work patterns will help when deciding the importance of a user story. - Don't be biased by the implementation plans:
This exercise is for identifying user needs. Clear your mind of ideas you have about what your product will look like. Assume that you do not know yet what product you will build. - Don't discuss implementation details or whether you are actually going to implement it:
At this point, your decision is whether the user's need is important enough for you to want to fulfil it. Implementation details can be discussed later. If a user story in the Nice-To-Have pile turn out to be too difficult to implement later, you can always not implement it. - Don't be too hasty to discard 'unusual' user stories:
Those might make your product unique and stand out from the rest, at least for some potential users. - Don't go into too much details when sorting user stories:
For example, consider this user story:- As a user, I want to see a list of tasks that needs my attention most at the present time, so that I pay attention to them first.*
When discussing this user story, you do not need to worry about what tasks should be considered 'needs my attention most at the present time'. Those details can be worked out later.
- As a user, I want to see a list of tasks that needs my attention most at the present time, so that I pay attention to them first.*
Step 3: Survey existing products
See how well existing products meet Jim's needs.
-
Select a few competing products to study. Each person should study at least one existing product. Identify strengths and weaknesses of the product w.r.t. how well it can cater for Jim’s requirements.
Here are some popular 'task manager' type products out there you can consider exploring (you are not limited to these): Google Calendar + Google Tasks | HiTask | Remember The Milk | Todo.txt | Todoist | Trello | Microsoft Outlook | Wunderlist
-
Note: Don’t get discouraged if an existing product meets Jim’s needs quite well. We are trying to learn SE, not sell a product.
-
After looking at existing products, you may want to go back and revise some of the user stories.
Step 4: Conceptualize the product as a user guide
- Based on your user story categorization in step 1 and given project requirements (note that the project requirements specify some must-have features), select which user stories you are likely to include in V0.5.
- Based on the user stories you selected above, specify the product you are going to build, in the form of a user guide. Yes, strangely enough, in this project we draft the user guide before we build the product. This will help you/us visualize the final product before you start implementing it.
- Remember to take into account the UI design and the functionalities available in AddressBook Level 4. As you will be using that software as the starting point of your implementation, it makes sense to align your product with it (within reason) to minimize the implementation effort.
- Remember to include the exact command format because it is the core part of your UI.
Use the documentation in the sample project as an example. Given below are pages to update.
-
User guide:
Describe what the product would be like when it is submitted at the end of the semester. Starting from the time user starts using the product for the first time, describe how the user uses the product to accomplish various tasks.
Here are some ‘quick start guides’ you can look at for inspiration when writing your user guide:
Collate project, iPhone :How to get started, TEAMMATES (for instructors)
Use UI prototypes/sketches if necessary. They can be simple sketches drawn on whiteboard/paper and scanned/photographed or created using a tool such as PowerPoint, HTML, or Balasmiq.
State what you honestly believe you can do, based on information you have at this point. You will not be penalized if you cannot deliver what you proposed to deliver. It is OK to tweak the project scope along the way.
Specify the command format in detail as it is an important part of the product functionality. -
Developer guide: Update the following appendices.
- User Stories: Give a list of the user stories, including priorities. This can include user stories considered but will not be included in the final product.
- Use cases: Give use cases (textual form) for a few representative user stories that need multiple steps to complete. e.g.
- Rescheduling a task, which may require two steps: locating the task first and then updating it.
- Checking a day's schedule at the end of the day: requires filtering the day's tasks, marking complete tasks as done, and rescheduling or deleting remaining tasks.
- Finding something to do where here is a free time.
- Non-functional requirements:
Note: User stories capture functional requirements. What are the non-functional requirements of your project? Many of the project constraints mentioned above are NFRs. You can add more. e.g. performance requirements, usability requirements, scalability requirements, etc. - Glossary: Define terms that are worth defining.
- Product survey: Describe a summary of the product survey. i.e. Pros, cons, (from Jim's point of view). Each student should document the product they explored. If multiple students have explored the same product, you may have to explore more products to complete this section.
Suggested length: Take the sample project as a baseline.
Submission: Update the relevant sections of the relevant markdown documents (i.e. UserGuide.md, DeveloperGuide.md) in your repo. git tag as V0.0.
Grading: Reaching this milestone (and future milestones) will be counted under 'Project management' component of the final project grade.
To claim this milestone as 'reached', you should at least have a full draft version of
the above documents in some format (e.g. GoogleDoc), even if you didn't have time to update the markdown documents in the repo.
V0.1 : The Walking Skeleton
V0.1 Product
This is the sample project morphed to be more like your target product. Functionality can be limited to only those that can be refactored from the sample project. e.g. support for adding and deleting floating tasks.
Submission: Push the code to GitHub and git tag as V0.1. Refer to the Schedule page for further submission instructions.
Grading: To consider this milestone as reached, you should have at least add/delete/find support for floating tasks. You should be able to do that by deleting/renaming the given Address Book code, without having to add too much
new code.
The most important thing is not to break the code while morphing sample code to your target product.
V0.1 Demo
 |
Demo the product to your tutor.
[Picture on left: an early version of the mobile phone] |
V0.1 Documentation
Update the following pages:
-
About Us page:
This page is used for module admin purposes. Please follow the format closely to avoid penalties. For example, use a recent solo photo with your face clearly visible (similar to those in the 'Teaching Team' page).
The photo of a team member should bedoc/images/githbubid.pnge.g.doc/images/damithc.pngwheregithubidis the team member's GitHub ID in lower case. Remove photos of the SE-EDU developers. No need to include a photo of the supervisor.Indicate the different roles played and responsibilities held by each team member. You can reassign these roles and responsibilities later in the project, if necessary.
Roles imply aspects you are in charge of and responsible for. E.g., if you are in charge of documentation, you are the person who should allocate who should write which part, ensure the document is in right format, ensure consistency etc. Here are some typical roles: - Team lead: Responsible for overall project coordination.
- Documentation (short for ‘in charge of documentation’): Responsible for the quality of various project documents.
- Testing: Ensures the testing of the project is done properly and on time.
- Code quality: Looks after code quality, ensures adherence to coding standards, etc.
- Deliverables and deadlines: Ensure project deliverables are done on time and in the right format.
- Integration: In charge of versioning of the code, maintaining the code repository, integrating various parts of the software to create a whole.
- Scheduling and tracking: In charge of defining, assigning, and tracking project tasks.
- [Tool ABC] expert: e.g. Eclipse expert, Git expert, etc. Helps other team member with matters related to the specific tool.
- In charge of[Component XYZ]: e.g. In charge of Model, GUI, Storage, etc. If you are in charge of a component, you are expected to know that component well, do the initial refactoring of the component (during V0.1 and V0.2) and review changes done to that component in V0.3-V0.5.
- You may define additional roles.
Please make sure each of the above roles are assigned to one person in the team. It is OK to have a ‘backup’ for each role, but you should still have one person who is unequivocally the main person playing that role.
-
README.md page: Update it to match your project. In particular, add a UI mockup of your intended final product.
Note that the image of the UI should bedoc/images/Ui.pngso that it can be downloaded by our scripts.
Also, remember to acknowledge the original source of the code i.e. The sample project created by SE-EDU initiative athttps://github.com/se-edu/
Grading: To consider this milestone as reached, you should have all V0.0 deliverables completed and the two documents mentioned above updated.
V0.2 : The MVP
V0.2 Product
This is the first MVP (Minimum Viable Product) version of the product.
-
It should be a viable, possibly minimal product. This is not a walking skeleton. A user should be able to use it. It may not be user-friendly, but it should not be unusable. Try to include at least the basic CRUD facilities for at least one type of tasks. Here are some examples that are NOT acceptable:
-
example 1. Has a well-developed functionality to add tasks but does not support commands for deleting or editing tasks: This is not usable because the user cannot rectify errors made while creating tasks.
-
example 2. Has all the CRUD functionality implemented but they are not connected to the UI: This too is not usable by the end-user.
-
While this is an internal release (not a production release), you are expected to maintain a reasonable code quality at all times. In particular, you should comply with the coding standard all the time.
Submission: Push the code to GitHub and git tag as V0.2.
Grading: To pass this checkpoint, your product should have reached the MVP stage.
V0.2 Documentation
You are encouraged to update your project documentation to match the product but you are not required to submit them for evaluation. Note that this flexibility is given solely to reduce your workload. In a production environment, the documentation should always be kept in sync with the product.
V0.2 Demo
As before, show the demo to the tutor during the tutorial.
The demo should use the version tagged as V0.2, not the latest code. No tinkering with code during the tutorial.
V0.3
V0.3 Product
This version should be a more functional version than V0.2 and should contain at least a basic version of features you intend to release in the final version.
Ideally, V0.3 should be good enough for dog fooding. Try to reach a dogfooding-ready version of the 'must have' features at least.
From V0.3, you are required to divide work based on features rather than component. That is, each team member should implement 0 or more features end-to-end, doing required changes in all components. The objective of this switch
is to force you to learn all components of the software, instead of limiting yourself to your own components.
Note that you will continue to be in charge of your own components although others will be modifying your components' code. Your
new role is to help others modify code in your components (you are supposed to be the most knowledgeable about those components) and protect your components from degrading. For example, you can review others' changes to your components and suggest
possible changes. This is also a good time to switch to a PR based workflow (if you haven't done that already) as PRs can be reviewed by other team members before merging.
Submission: V0.3 (and future milestones) should be released using GitHub's release mechanism. The release should include an executable JAR file. Refer the 'Making a Release' section of the sample developer guide for more info.
Grading: To pass this checkpoint, your product should be noticeably better than an MVP. It goes without saying that other project management requirements expected at reaching a milestone (mentioned in the 'Using Milestones' section of Appendix E) are applicable too.
V0.3 Documentation
Follow the documentation in the sample project in terms or organization, level of details, etc.
- User Guide: Update User Guide to match what you plan to deliver at V0.5
- Developer Guide: Update Developer Guide to match your current design or the design you plan to have at V0.5.
[1] While it is OK for some sections to be written collectively, each student should have some sections that were written individually. For example, the section describing the design of Logic component should be written by the person in charge of the Logic component.
[2] It is not enough to simply do minor tweaks to the existing document to match your project if your design is very similar to the sample given. We need to see a significant amount of content written by each student to judge how well you can document technical details and use relevant models.
Here are some things you can add:- Compare the current design with other alternative designs possible.
- Add more descriptions e.g. show at least one interaction within each component.
- Use object diagrams to show sample object structures at runtime (if it helps the reader).
- Explain how you implemented complicated features such as undo/redo.
- In future (after these topics have been covered):
- Use Activity Diagrams and OO Domain Models where applicable.
- Mention where design patterns/principles are applied.
Submission: Must be included in the version tagged V0.3.
Grading: To pass this checkpoint, your documentation should have been updated to match your project.
V0.3 Demo
Submission: Demo to the tutor during the tutorial. Use jar file for the demo, not the IDE.
Grading: Must use the version tagged V0.3 and should be at least very close to a dog-fooding-ready state.
V0.4
V0.4 Product
Functionality expectations: This version should have decent implementations of all major features you intend to release, although some finer tweaks may be missing and not completely stable.
Dogfood your product and find ways to improve it. Remember to keep the dogfooding version of the app (i.e. the jar file) in a separate folder as evidence of dogfooding. i.e. Don't use the IDE for dogfooding (Dogfooding is an acceptance test; it should be done in the user environment)
Mark your code with special tag @@author so that we can extract code written by each of you using the collate tool (for evaluation purposes). After that, Use the collate tool to extract individual code and look through
the generated .md files to ensure all your code has been extracted correctly. Push the *.md files created to a folder called /collated in your repo. More instructions below.
Extract your code for code quality grading
-
Download
Collate-TUI.jarfrom the Collate Tool project. -
Mark your code with a
//@@author matric-number. Note the double@. The comment syntax may vary based on file type e.g. for markdown, fxml, html<!-- @@author matric-number -->Here is a sample code file:
//@@author A0909865T method 1 ... method 2 ... //@@author A0702345U method 3 ... //@@author A0909865X method 4 ... -
The
//@@authortag should appear only at the beginning of the code a person wrote. The code up to the next//@@authortag or the end of the file (whichever comes first) will be considered as was written by that author.
However, you may put an empty//@@author(i.e. no matric number) to indicate the end of the code segment you wrote, if you don't know who wrote the code segment below yours. The author of that code segment can add the matric number to the empty tag later. -
If a method was written by more than one person, the
//@@authortag should indicate the person who wrote most of that method. i.e.,//@@authortag should not appear inside a method.
If some part of the code was done collectively, you should still divide it up to reflect the amount of work each person contributed. For example, if 3 people wrote 150 lines of code and put in equal effort in doing so, you can divide the methods among yourselves roughly 50 lines to each person. Once a code segment is allocated to one person, that person is responsible (and will be graded for) the quality of that code. If parts of that code was written by someone else and those parts are not of high quality, the designated author should refactor the code to make it high quality.
Tip: GitHub has a 'blame' feature and a 'history' feature that can help you determine who wrote a piece of code. -
Do not put the
//@@authorinside java header comments as only the content below that tag will be collated./** * Returns true if ... * @@author A0909865T *///@@author A0909865T /** * Returns true if ... */ -
If you wrote a significant amount of code that was not used in the final product,
- Create a folder called
{project root}/unused - Move unused files to that folder (those files should contain unused code only)
- use
//@@author matric-numberto mark unused code in those files.
e.g.
//@@author A0909865T-unused
method 1 ...
method 2 ...
Please put a comment in the code to explain why it was not used.
- Create a folder called
-
The
//@@authortag should be used to mark all code/test you claim credit for. There is no need to mark documentation files.
You will be penalized if you try to boost the length of your collated files using unethical means such as duplicating the same code in multiple places. In particular, do not copy-paste test cases to create redundant tests. Even repetitive code blocks within test methods should be extracted out as utility methods to reduce code duplication.
Individual members are responsible for making sure their own collated files contain the correct content.
If you notice a team member claiming credit for code that he/she did not write, you can email us (after the final submission) to let us know.-
INCLUDE: everything that required significant ‘writing’ effort. e.g. comments, test code, styling (e.g. css), xml, even test data files. But do not include chunks of text that were trivially copy pasted e.g. a test data file with 1000 tasks that was used to test performance.
-
Code you reused from elsewhere: Mark such code as
//@@author matric-number-reusede.g.
//@@author A0909865T-reused method 1 ... method 2 ... -
EXCLUDE code generated by the IDE/framework. You may also mark such code
//@@author generatede.g.
//@@author generated
method 1 ...
method 2 ...
-
-
You need to put the,
- collated functional code in
collated/mainfolder, - collated test code in
collated/testfolder, and - collated unused code in
collated/unusedfolder
Given below are DOS sample commands you can put in a batch file and run it to collate the code.
java -jar Collate-TUI.jar collate from src/main to collated/main include java, fxml, css

java -jar Collate-TUI.jar collate from src/test to collated/test include java

java -jar Collate-TUI.jar collate from unused to collated/unused include java, fxml, css
The output should be something like the structure given below.
collated/ main/ A000000.md A111111.md A222222.md A222222reused.md test/ A000000.md A111111.md A222222.md unused/ A000000.md - collated functional code in
Submission: Push the code (including the collated folder and files created above) to GitHub and tag as V0.4.
Grading: To pass this checkpoint, your product should satisfy the description given above and the code should be collated properly.
V0.4 Documentation
Recommended to update the documentation to match the product, at least w.r.t. major changes since previous version.
Update the AboutUs.md page to reflect this sample.
Use the appropriate hyperlinks (as given in the sample) to substantiate your claimed contribution.
Note: AboutUs.md page is used for module admin purposes. You are advised to follow the format closely to avoid
penalties. E.g. those you don't have a suitable photo in that page will be penalized.
Submission: Must be included in the version tagged V0.4.
Grading: Not graded.
V0.4 Demo
Submission: To be done during the tutorial, but note the following:
- Duration: 10 minutes (max)
- It should be a 'well prepared' demo. You should know in advance exactly what you'll do in the demo.
- It should be a full demo: Cover all features you have, not just features you added recently.
- It is a 'sitting down' demo: As before, you'll be demonstrating the features using the TV while sitting down.
- Tutor will not interrupt you during the demo. That means you should finish within the given time.
- It should be done by 2 members (i.e. one person do the first half, the other do the 2nd half).
If you are not taking part in this demo, you must take part in V0.5 demo.
One or more persons can do the typing for the whole demo. Speaking should be done by the two designated to do the demo. - The app should be populated with a significant amount of realistic data at the start. e.g data going back to at least two weeks and up to two weeks in future, about 50 items in total.
Grading: Similar to V0.3
V0.5rc : The Release Candidate
V0.5rc Product
Functionality expectations: Freeze features after reaching this milestone. As this is a ‘release candidate’ it should have all the features you intend to release. Adding more features after this point is risky. The remaining time
should be left aside for fixing problems discovered late.
Other suggestions:
- Dogfood your product intensively and improve it based on your findings.
- Bring code coverage near to your target if it is low.
- After you have sufficient code coverage, fix remaining code quality problems and bring up the quality to the level you target.
Submission: as before.
Grading: Your product should show significant progress since the previous milestone.
V0.5rc Documentation
Recommended to update the documentation to match the product.
Submission: Must be included in the version tagged V0.5rc.
Grading: Not graded.
V0.5rc Demo
Submission: as before.
Grading: as before.
V0.5 : The Production Release
V0.5 Product
This is as a ‘production release’. It should be at least ‘near production quality’.
Please follow submission instructions closely. Any non-compliance will be penalized. e.g. wrong file name, team member photos not suitable, product manual page header doesn't have the team ID, etc.
Add these two new files to the repo (these will be used by our testers when testing your final submission):
{project root}\src\test\data\ManualTesting\SampleData.xml:
Sample data that can be loaded to your app. Should contain 50+ items covering past and present.{project root}\src\test\data\ManualTesting\TestScript.md:
A document explaining the steps to perform manual testing (i.e. manual scripted testing), starting with how to load the sample data.
Should cover all functionality of the product.
Should specify the command to type and the expected result (screenshots not required).
Limit the test cases to about 20 minutes worth of testing.
Submission:
- Source code: Push the code to GitHub and tag with the version number. Source code (including collated .md files; please ensure the collated .md files are up to date, you will not be allowed to updated them later) Note that the quality of the code in these .md files accounts for 15 marks of your final score, graded individually.
- Executable: upload to IVLE as an exe or jar or zip file (this should not contain source files). File name:
[team][project name].jare.g. [T09-B1][ToDoo Pro].jar
Warning: When determining the late submission penalty, we take the latest submission even if the same exact file was submitted earlier. Do not submit the same file multiple times if you want to avoid unnecessary late submission penalties.
Deadline: Week 13 Monday 23.59.
Grading: Given in a section below.
V0.5 Documentation
Submission:
- Update User Guide, Developer Guide, README, and AboutUs pages on GitHub.
- Convert User Guide into a pdf file and name it as
[TEAM_ID][Project Name]UserGuide.pdfe.g.[T09-B1][ToDoo Pro]UserGuide.pdf - Similarly, convert the Developer guide into a pdf file, name it as
[TEAM_ID][Project Name]DevGuide.pdfe.g. [T09-B1][ToDoo Pro]DevGuide.pdf - Upload both pdf files to IVLE.
Deadline: Same as V0.5 product.
Grading: Given in a section below.
V0.5 Demo
- Venue: Same as the tutorial venue.
- Duration: Strictly no more than 12 minutes. Exceeding this limit will be penalized.
- Schedule: Your demo timing is same as your tutorial time in week 13.
Starting times:Team B1: 00 minutes, B2: 15 minutes, B3: 30 minutes, B4: 45 minutes
At least some team members need to arrive 15 minutes ahead of the allocated time to set up your computer.
There is an automatic penalty if you are not ready to start on time.. - Target audience: Assume you are giving a demo to a higher-level manager of your company, to brief him/her on the current capabilities of the product.
The scenarios you demonstrate should be chosen judiciously so that you cover the full range of your product's functionality. Give more time to stronger features (i.e. cover mundane/basic features fast). It is recommended you showcase how the product improves the user’s workflow rather than simply describe each feature.
No need to cover design/implementation details as the manager is not interested in those details. - Dress code : The level of formality is up to you, but it is recommended that the whole team dress at the same level.
- Testing: All team member should remain in the holding area during the tutorial slot (when you are not doing the demo) because our testers might need to communicate with you during the testing.
Holding area for Active Learning Room: Unused area of the room (enter by the door near the staircase)
Holding area for SR5: Tables outside SR5 - Structure:
Demo the product using the same executable you submitted, on your own laptop, using the TV.
Every team member should take part in the demo. However, it's ok for one member to do all the typing. - Optimizing the time:
Try to make the maximum use of the short demo time in the following ways,-
Spend as much time as possible on demonstrating the actual product. Not recommended to use slides (if you do, use them sparingly) or videos or lengthy narrations.
Avoid skits, re-enactments, dramatizations etc. This is not a sales pitch or an informercial. While you need to show how a user use the product to get value, but you don’t need to act like an imaginary user. For example, [Instead of this]Jim get’s a call from boss. "Ring ring", "hello", "oh hi Jim, can we postpone the meeting?" "Sure". Jim hang up and curses the boss under his breath. Now he starts typing ..etc.
[do this]If Jim needs to postpone the meeting, he can type …
It’s not that dramatization is bad or we don’t like it. We simply don’t have enough time for it.
Note that CS2101 demo requirements may differ. Different context → Different requirements. -
Rehearse the steps well and ensure you can do a smooth demo. Demos that are clearly under-prepared will be penalized.
-
If you are not deft with using the laptop’s touchpad, please bring a mouse.
-
Don’t waste time repeating things the target audience already knows. Assume the target audience knows that the product is a task manager targeting Jim-like users. That means no need to explain those things again.
Also assume the target audience knows who you are. That means no need to say things like "We are students from NUS, SoC". -
Bring sufficient amount of sample data and know how to load them to the system. You should not plan to type all the sample data during the demo itself. On the other hand, trying to demo a product using just a couple of sample tasks creates a bad impression too.
-
Plan the demo to be in sync with the impression you want to create. For example, if you are trying to convince that the product is easy to use, show the easiest way to enter a task before you show the full command with all the bells and whistles.
-
Grading: Given in a section below.
Project retrospective
This is an individual submission.
The project Retrospective answers the following question: If you were to redo this project from the beginning, what would you do differently and why?
- Approach this submission from a software engineering perspective. As much as possible, connect your answers to lecture content.
- State at least three things you would do differently.
- Justify your answers using concrete details. What didn’t work this time? How do you plan to avoid the problem next time? Why do you think the modification will give you a better outcome.
Suggested length: about 0.5 page worth of content.
Submission: Via TEAMMATES. More instructions to follow.
Deadline: Reading week Monday 2359
Individual report
The purpose of this report is to help us in grading students where a student may have done significantly more/less than an equal share. Submit this only if you were specifically asked to OR if you have a disagreement with the phase B final peer evaluation.
The report should contain an itemized list of your contribution to the project. Be as concrete and precise as possible. For example, you can mention how many lines of code you wrote in which classes, which parts of the documentation were done by you, etc.
Note that this report is visible to your team member and they may be asked to verify its accuracy.
Suggested length: about 0.5-1 page worth of content.
Submission: Via TEAMMATES. More instructions to follow.
Deadline: End of reading week.
Project Assessment
Note that project grading is not competitive (not bell curved). CS2103T projects will be assessed separately from CS2103 projects. This is to account for the perceived difference in workload. Given below is the marking scheme.
Total: 50 marks (25 individual marks + 25 team marks)
-
Product features [team][10 marks] - How good is your software as a product?
Based on the features implemented, how well they fit together to make a good product, and how well they are demonstrated.
‘Half-baked’ (i.e. not production quality) or 'ill-fitting' (feature does not go well with the other features) features will not earn marks at all and could even be penalized. It may be better to remove such features before submission.
-
Design [individual][5 marks] - How good is your internal design?
Evaluated solely based on what we can learn from the developer guide. Evaluated by lecturer. You will be graded individually on the design of your component and how well you have described it. Collective design decisions such as architecture will affect the grade of all team members.
Criteria considered:
- Conformance with the multi-level top-down approach (i.e. design at high-level first, and do the lower-level design of each component later)
- Conformance with the OO paradigm
- Application of patterns and principles
- Quality of documentation e.g. using the right diagram at the right place.
-
Implementation [individual][15 marks] - How good is your implementation? A measure of the quality and the quantity of code you have written yourself. On average, a student is expected to write 0.5-1.5 KLoC. Evaluated based on an inspection of the collated code (submitted in your *.md files) by at least two tutors.
Criteria considered:- Following SLAP (IMPORTANT).
- Following the coding standard given (IMPORTANT).
- Using at least some assertions.
- Using at least some logging.
- Using at least some unit tests.
- Commenting at the right level.
- Exception handling.
- Neatness and human readability.Expectations:
- Each person is expected to implement one or more features individually in addition to features implemented collectively. Each person is expected to write backend code, frontend code, test code, user documentation, and developer documentation.
-
QA [team: 5 marks], [individual: 5 marks] - How good is your Quality Assurance? Evaluated based on our own testing. A well written user guide and a product that conforms to the user guide (i.e. no bugs) will give you a high mark.
Things considered for team grade: Bugs including validation issues (i.e. not meeting project requirements)
Things considered for individual grade: Quality and quantity of the test code in your collated code.
Expectations:
- There is no requirement for a minimum coverage level. Note that in a production environment you are often required to have at least 90% of the code covered by tests. In this project, it can be less.
- How much of each type of testing should you do? We expect you to decide. You learned different types of testing and what they try to achieve. Based on that, you should decide how much of each type is required. Similarly, you can decide to what extent you want to automate tests, depending on the benefits and the effort required.
- Applying TDD is optional. If you plan to test something, it is better to apply TDD because TDD ensures that you write functional code in a testable way. If you do it the normal way, you often find that it is hard to test the functional code because the code has low testability.
- Documentation [team][5 marks] - How well does your user guide achieves its objectives? Evaluated by lecturer and TA.
Criteria considered:- Explanation should be clear and written to match the audience.
- Good use of visuals to complement text.Note: Developer Guide is graded under the 'Design' component.
- Project management [team: 5 marks][individual: 5 marks] - How well you worked together as a team to follow a systematic process?
For the team component, we look for,- Good version control, based on the repo.
- Good task definition, assignment and tracking, based on the issue tracker.
- Good use of buffers (opposite: everything at the last minute)
- Iterative (opposite: fake iterative, doing most of the work in one iteration).
Passed almost all checkpoints from V0.0 to V0.5The individual component is determined by peer evaluation from your project team members.
Penalty for late submission:-1 mark for each hour delayed. Even a 1-second delay is penalized, irrespective of the reason. Based on the time shown by IVLE.
Project Supervision
Your tutor for phase B will also be your project supervisor.
Tutorial time is the main avenue for meeting your tutor. In addition, you can meet the tutor before/after the tutorial, or any other time, as many times you need, subject to availability in his/her schedule. However, please note that it is not the tutor’s job to chase you down and give help. It is up to you to get as much feedback from the project tutor as you need.
Furthermore, it is not the job of the project supervisor to lead your project to success. His/job is to observe, evaluate, and give feedback. You are free to request more feedback from the tutor as necessary.
Forming Teams
|
The two teams:
Phase A (Weeks 1 - 5) is the period for strengthening individual competencies. By working with different classmates during this period you get to know and learn from more classmates. The project is done in phase B. That means your Phase B team is also your project team. |
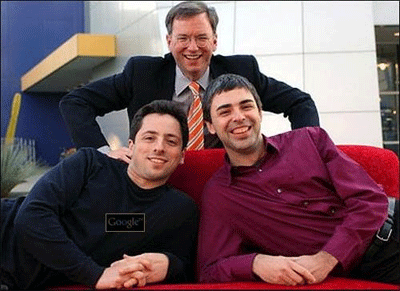
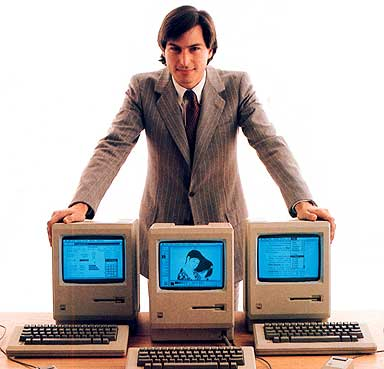
[Picture: The team that was at the top of early Google] |
There cannot be any overlap between your 2 teams. For example, any member from your Phase A team cannot be a member of your Phase B team.
When to form teams
- CS2103T: Your phase A team will be formed by CS2101 side in week 1. Your phase B team (applicable to CS2101 too) will be formed by CS2103T side on week 5.
- CS2103: Form tentative Phase A teams in week 2 (during the tutorial). Finalize phase A team in the subsequent tutorial. Form phase B team on week 5.
Team size: The default team size is four. Please do not form teams with five or more.
Team ID: This will be given to you after forming teams in each phase. It has the form TUTORIAL_ID-PHASE+TEAM_NUMBER e.g, W14-A2 means you are in tutorial W14 (i.e., Wed 1400-1500), phase A, team 2.
Team composition
We allow some freedom in choosing team members, subject to these constraints:
-
Teams of single nationality are not allowed (rationale: to train you to work in multicultural teams). However, we allow same nationality teams if the only language common among all team members is English. e.g. an all-Singaporean team that include both Chinese and Malay students.
-
No more than one exchange students per team (rationale: to increase interaction between exchange students and NUS students).
-
All team members should be in the same tutorial. Delay forming teams until your place in a tutorial is confirmed. We do not allow changing tutorials to team up with your preferred team mates.
-
Also note that we may modify teams when circumstances call for it. There is no avenue for you to object. Staying with your preferred team is not guaranteed.
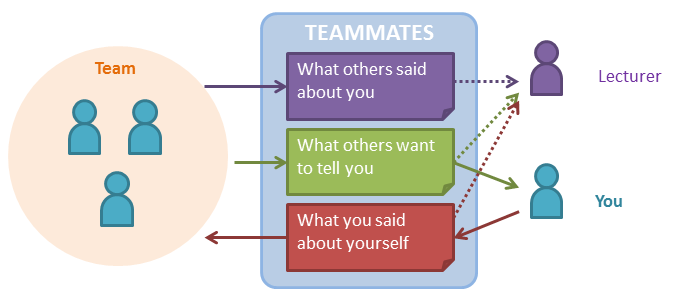
Peer Evaluations
We use the TEAMMATES online peer evaluation system to conduct several rounds of peer-evaluations. All peer evaluations will be taken into account when determining your participation marks. The system also allows you to give anonymous feedback to your teammates.
Extra Requirements: [considered for participation marks]
- Submitting peer evaluations is compulsory. If you routinely miss submitting peer evaluations, you forfeit your participation marks.
- TEAMMATES normally allows students to access it without using Google login. In this module, we require you to login to TEAMMATES using your Google account. and update your
- After you login to TEAMMATES, please complete the profile . CS2103 is a big class. This profile helps us to remember you better, even after the module is over.
- In the profile, you are encouraged (but not compulsory) to provide your long term contact email (not school email) as the contact email. This contact email is for keeping in touch after graduation.
john@comp.nus.edu.sgjohn@gmail.com - Please upload a suitable profile photo.
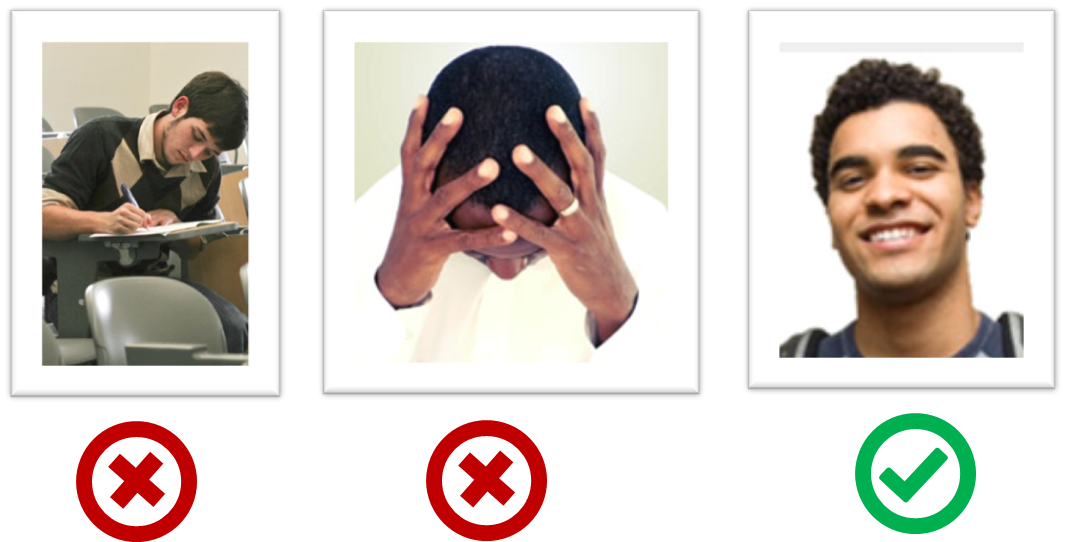
The purpose of the profile photo is for the teaching team to identify you. Therefore, you should choose a recent individual photo showing your face clearly. Some examples can be seen in the 'Teaching team' page. Given below are some examples of good and bad profile photos.
Giving constructive feedback to others is a valuable skill for software engineers. It is also an intended learning outcome of this module. Those who give ineffective feedback will be penalized.
Here are some things to keep in mind:
- Assume you are giving feedback to a colleague, not a friend. Keep the tone of your feedback reasonably professional. Do not use offensive language or slang.
- The feedback should be honest and consistent. Giving positive qualitative feedback (e.g.
Thanks for all the hard work!and negative ratings (e.g.Equal share - 40%) to the same team member is not being honest. - State your expectations early. All too often students give positive/neutral feedback early (hoping that the team member will improve later) and trash the team member in the final evaluation (because the he/she did not improve as expected). However, this could be confusing to the recipient. It is better to give negative feedback early so that the team member gets a clear signal that he/she needs to improve.
The final peer evaluation will be used to determine the level of contribution from each member to the project. In that peer-evaluation you will be asked to estimate the contribution of each team member (including yourself) to the project so far.
Final peer evaluation affects your gradein the following way:
- If there is a general consensus about how much each one contributed, we award grades based on the contribution levels submitted through the peer evaluation. i.e., if everyone agrees you did more than others, you get more marks.
- If there are significant discrepancies in the peer evaluations (e.g., you say you did an [equal share + 20%] while your team says you did an [equal share - 10%]), we will investigate further before finalizing project marks. For such teams, we are likely to request some or all members to submit an additional individual report to itemize and quantify the contribution to the project. Overclaimers will be penalized. Please do not claim high just to ‘see how’.
Peer evaluations are not visible to undergraduate tutors.
If you disagree with the team’s opinion, i.e., you think the perceived contribution is significantly different from what you actually contributed, you can help us grade you fairly by submitting an individual report (‘individual report’ is explained under V0.5 deliverables).
Keep in mind the contribution numbers reported by TEAMMATES are based on team member perceptions and may not reflect your real contribution. We use those numbers primarily to identify cases that need further investigation.
You may ignore minor variations in the contribution numbers reported by TEAMMATES. For example, the difference between [Equal share] and [Equal share - 2%] is not significant and can very well be due to rounding off within the system.
Also keep in mind that it is human nature for one to downplay the value of contributions from others when one’s own contribution is being compared to that of others. As a result, it is common for the ‘perceived contribution’ to be somewhat lower than what you actually did.
If you are unhappy about the peer-feedback received and would like to make your views known to the team, please allow at least one day to lapse before you fire off a response email. You are likely to respond more rationally when you had some time to think it over. Also keep in mind that we do take note of how well you handle such a situation. You need to act professionally when facing conflicting views, opposition, and even deliberate sabotage.
|
A final note on this issue : Please be sincere about how much you can do from the beginning, rather than let your team members figure it out over the long run. Tell them how much you can do and what kind of work you are willing to do. If you are not open about it, they will still figure it out at the end; they will still report it (via the peer-evaluations), and your score will be adjusted all the same. Being open about it on the other hand can save everyone a lot of frustrations, unpleasantness, and bitterness. |
 |
Project Tools

Communication:
Keeping a record of communications among your team can help you, and us, in many ways. We encourage you to do at least some of the project communication in written medium (e.g., GitHub Issue Tracker) to practice how to communicate technical things in written form.
Collaboration platform: We are going to use GitHub as the hosting and collaboration platform of your project (i.e., to hold the Code repository, Issue Tracker, etc.). See Appendix E for more info on how to setup and use GitHub for your project.
IDE: We require you to use Eclipse (latest stable release) for module related programming work. Because all team members will work on the same code base and project tutors too have to go through the code for testing and evaluation, it is troublesome to use multiple IDEs. Furthermore, when everyone uses the same tool, it creates a bigger collective know-how about the tool which makes troubleshooting easier and the productivity higher.
Revision control:
You are required to use Git. Other revision control software are not allowed.
The recommended GUI client for Git is SourceTree (which comes bundled with Git), but you may use any other, or none.
Exams
No midterm.
Final exam:
- 2 hours, open book, essay type questions (no MCQ), covers materials from all lectures, handouts, and tutorials.
- Sample exam papers that are closest to this semester's format (and examiner's comments) can be found here.
- Attend the last two lecture to learn more about the exam paper.
- Exam consultations (consultations near the exam) are discouraged but allowed. We prefer you to learn and clarify along the way, not at the end.
- Study tips:
- Go through the worked examples in handouts.
- Try past exam papers. Try to answer the questions before looking at answers given.
- Learn all parts of the project, not just the part you did.
- Explore how your project can be extended to support more features.
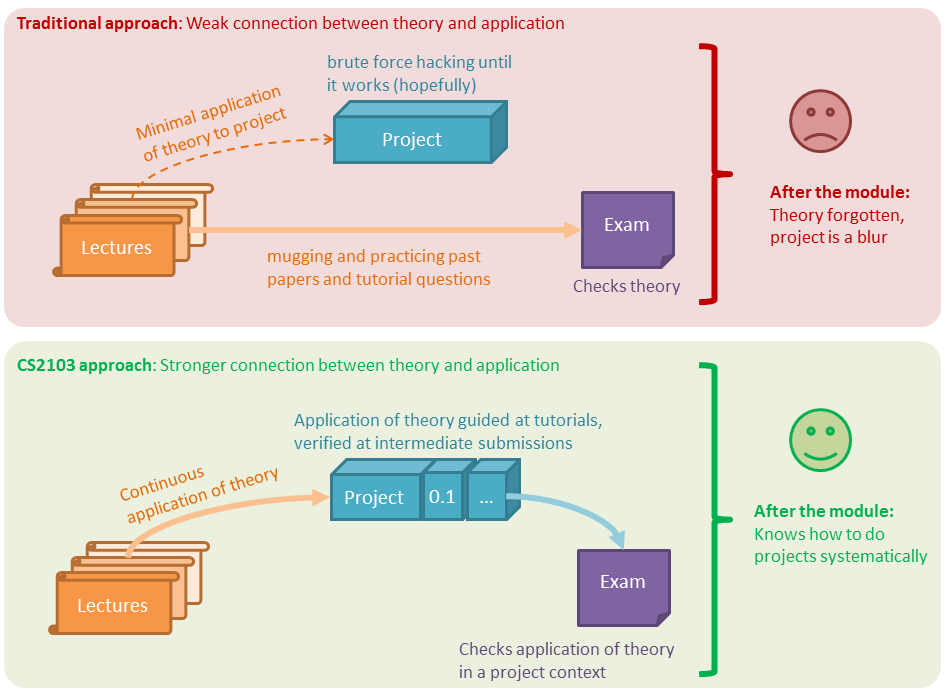
Note that CS2103 paper measures how well you can apply the theory to a project. Therefore, the exam is strongly connected to the project and how you applied theory in the project. The exam will be easy for you if you attend lectures, participate in tutorials(tutorials too are focused on application of theory to the project), and do a sincere job in the project. You will not be able to ace the exams by simply doing past papers just before the exams.
Grade Breakdown
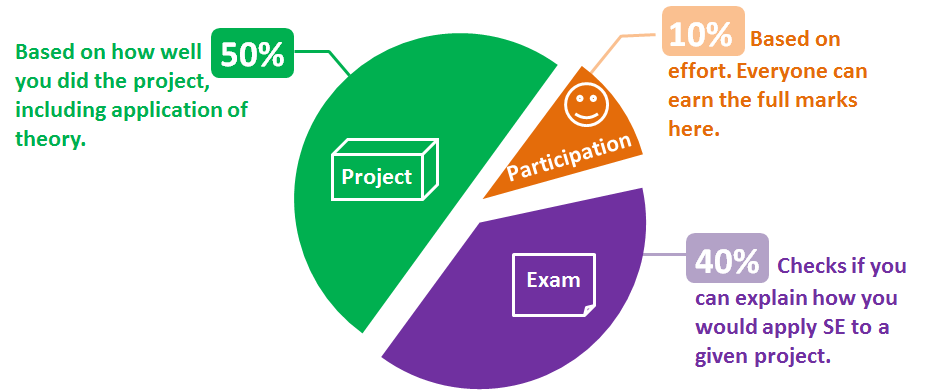
- [50%]Project
- [40%] Final exam.
- [10%] Participation.
Participation Marks
To get the full 10 marks allocated for participation you should satisfy the following criteria, evaluated based on peer evaluations and tutor observations. We will also take into account data recorded in other systems e.g. GitHub, IVLE.
- Consistent Effort
- Finished at least 7 post-lecture quizzes. You must get all answers correct for a quiz to count for participation. As you know, the quiz allows unlimited attempts and we count the best attempt only.
- Does some preparatory work before tutorials.
- Timeliness
- Not frequently late for meetings/tutorials.
Arriving more than 5 minutes late for a tutorial is considered late. - Almost always delivers/submits on time.
- Not frequently late for meetings/tutorials.
- Teamwork
- Helps team members when possible and engages team members’ help when needed. This also means the student attends weekly meetings and works with others to complete the learning activities.
- Communicates sufficiently and professionally. Does not use offensive language in project communications.
- Responds to communication from team members in a timely manner (e.g. within 24 hours).
- Reliability
- Promises what he/she will contribute in advance, and delivers what’s promised.
- Does not deliver work products that seem to be below the student's competence level i.e. tries his/her best to make the work product as high quality as possible within his/her competency level.
- Meticulousness
- Rarely overlooks a submission requirements.
- Have not missed compulsory module activities such as completing the TEAMMATES profile.
The scheme tries to,
- Make the participation effort independent of the competency level. I.e. If you have the right attitude and put in a consistent effort, you should be able to get full marks for participation.
- Not demand perfection. You should be able to earn full marks even if you falter occasionally.
Appendix A: Module Principles
[ You . Together . Continuously . Reach ]
These are some of the main principles underlying the module structure.
The product is you, NOT what you build.
The software product you build is a side effect only. You are the product of this module. This means,
- We may not take the most efficient route to building the software product. We take the route that allows you to learn the most.
- Building a software product that is unique, creative, and shiny is not our priority (although we try to do a bit of that too). Learning to take pride in, and discovering the joy of, high quality software engineering work is our priority.
Following from that, we evaluate you on not just how much you've done, but also, how well you've done those things.
Here are some of the aspects in which we try to make you more professional:
|
We appreciate ... |
But we value more ... |
|
Ability to deal with minute details |
Ability to abstract over details, generalize, see the big picture |
|
A drive to learn latest and greatest technologies |
Ability to make the best of given tools |
|
Ability to find problems that interest you and solve them |
Ability to solve the given problem to the best of your ability |
|
Ability to burn the midnight oil to meet a deadline |
Ability to schedule work so that the need for 'last minute heroics' is minimal |
|
Preference to do things you like or things you are good at |
Ability to buckle down and deliver on important things that you don't necessarily like or aren't good at |
|
Ability to deliver desired end results |
Ability to deliver in a way that shows how well you delivered (i.e. visibility of your work) |
We learn together, NOT compete against each other.
You are not in a competition. Our grading is not forced on a bell curve.
Learn from each other. That is why we publish submissions.
Teach each other, even those in other teams. Those who do it well can become tutors next time.
Continuously engage, NOT last minute heroics.
We want to train you to do software engineering in a steady and repeatable manner that does not require 'last minute heroics'.
In this module, last minute heroics will not earn you a good project grade, and last minute mugging will not earn you a good exam grade.
Where you reach at the end matters, NOT what you knew at the beginning.
When you start the module, some others in the class may appear to know a lot more than you. Don't let that worry you. The final grade depends on what you know at the end, not what you knew to begin with. The full 10% allocated to intermediate deliverables is within the reach of everyone in the class irrespective of their prior knowledge.
Appendix B: Module Policies
Policy on following instructions
When working with others, especially in a large class such as CS2103, it is very important that you adhere to standards, policies, and instructions imposed on everyone. Not doing so creates unnecessary headaches for everyone and sends negative signals about your work attitude. That is why we deduct participation points for not following instructions carefully.
Policy on grading smaller/larger teams
We do take team size into account when grading.
3 member teams are allowed to do slightly less than 4 member teams (i.e., 10-15% less) and 5 member teams are expected to slightly more than 4 member teams (i.e., 10-15% more). The variation of expected output is less than 25% (although the variation in team size is 25%). This is to account for the fact that extra people adds to the communication overhead.
Policy on project work distribution
It is OK to do less or more than equal share in your project team. However, be prepared to receive a different grade than your team members if you didn't do an equal share.
Everyone is expected to do a write back-end code, frontend code, tests, user documentation, and developer documentation. If you limit yourself to tasks like documentation only, you are likely to fail the project component.
Policy on absence due to valid reasons (e.g. MC, LOA, University events)
There is no need to inform us. If you miss a lecture/tutorial for a valid reason, just do your best to catch up. We'll be happy to help if required. An occasional absence or two is not expected to affect your participation marks.
Only if
you fail to earn full marks for participation we will consider giving an alternative avenue to earn marks missed due to the absences.
Policy on email response time
I will respond to you within 24 hours if it was an email sent to me or a forum post directed at me. If you don't get a response within that time, please feel free to remind me. It is likely that I did not notice your post or the email got stuck somewhere.
Similarly I expect you to check email regularly and respond to emails written to you personally (not mass email) promptly.
Not responding to a personal email is a major breach of professional etiquette (and general civility). Imagine how pissed off you would be if you met me along the corridor, said 'Hi Damith, good morning' and I walked away without saying anything back. Not responding to a personal email is just as bad. Always take a few seconds to at least acknowledge such emails. It doesn't take long to type "Noted. Thanks" and hit 'send'.
The promptness of a reply is even more important when the email is requesting you for something that you cannot provide. Imagine you wrote to me requesting a reference letter and I did not respond at all because I didn't want to give you one; You'll be quite frustrated because you wouldn't know whether to look for another professor or wait longer for my response. Saying 'No' is fine and in fact a necessary part of professional life; but saying nothing is not acceptable. If you didn't reply, the sender will not even know whether you received the email.
Policy on tech help
Do not expect your project tutor to code or debug for you. We strongly discourage tutors from giving technical help directly to their own teams because,we want to train you in troubleshooting tech problems yourselves. Allowing direct tech help from tutors transfers the troubleshooting responsibility to tutors.
It is ok to ask for help from classmates even for assignments, even from other teams, as long as you don't copy from others and submit as your own. It doesn't matter who is helping you as long as you are learning from it.
We encourage you to give tech help to each other, but do it in a way that the other person learns from it.
Please refer Appendix D: How to get Help in CS2103/T.
Policy on publishing submissions
The source code are publicly available and are available for reuse by others without any restrictions.
Is publishing submissions unfair to the team? We don't think so. If you were the first to think of something your peers are willing to
adopt later, that means you are already ahead of them and they are unlikely to earn more marks by adopting your ideas.
Policy on plagiarism
What's allowed:
We encourage sharing, but you should share with everyone in the class, not just a selected group. That is,
- You are not allowed to share individual assignments with classmates directly.
- You are not allowed to share project-related things with other teams directly.
However, note that most submissions will be published to the class after the submission deadline, after which they can be 'reused' by others subject to the 'reuse policy' given below.
If you submit code taken from elsewhere, you need to comply with our reuse policy.
Detection:
Detecting plagiarism in code is quite easy. You are not fooling anyone by reordering code or renaming methods/variables. Besides, all your submissions are published to the class and sooner or later somebody will notice the plagiarism.
Penalties:
- For activities earning participation marks: We make a record of cases of plagiarism but we do not take further action. Because participation marks are given for effort and all students can earn the full marks easily, such plagiarism does not disadvantage other students. Therefore, we prefer to spend all available resources on helping honest students to do better rather than to chase after dishonest students. If you think you gain something by plagiarizing, go ahead and do it. It's your choice and it's your loss.
- For the final project/exam: Any case of claiming others' work as yours will be reported to the university for disciplinary action.
Policy on reuse
In general, reuse is encouraged. However, note that reuse has its own costs (such as the learning curve, additional complexity, usage restrictions, and unknown bugs). Furthermore, you will not be given credit for work done by others. Rather, you will be given credit for using work done by others.
- You are allowed to reuse work from your classmates, subject to following conditions:
- The work has been published by us or the authors.
- You clearly give credit to the original author(s).
- You are allowed to reuse work from external sources, subject to following conditions:
- The work comes from a source of 'good standing' (such as an established open source project). This means you cannot reuse code written by an outside 'friend'.
- You clearly give credit to the original author. Acknowledge use of third party resources clearly e.g. in the welcome message, splash screen (if any) or under the 'about' menu. If you are open about reuse, you are less likely to get into trouble if you unintentionally reused something copyrighted.
- You do not violate the license under which the work has been released. Please do not use 3rd-party images/audio in your software unless they have been specifically released to be used freely. Just because you found it in the Internet does not mean it is free for reuse.
- Always get permission from us before you reuse things from elsewhere. Please post your 'request to use 3rd party library' in IVLE forum for approval. That way, the whole class get to see what libraries are being used by others.
Policy on help from outsiders
In general, you are not allowed to involve outsiders in your project except your team members and the teaching team. However, It is OK to give your product to others for the purpose of getting voluntary user feedback. It is also OK to learn from others as long as they don't do your project work themselves.
Policy on suggested length for submissions
We don't usually give a page limit for submissions. You need to decide yourself how long the document should be based on the purpose and the intended audience. You can determine the level of details required based on the samples we provide.
Appendix C: Frequently Asked Questions
Why the workload is so high?
CS2103/T prepares you for many higher-level project modules (CS3216/7, CS3201/2, CS3281/2/3/4, CG3002, etc.), each requiring a slightly different skill set. It is also the only SE course some of you do before going for industry internships. Therefore, we have to cover many essential SE concepts/skills and also provide enough exercises for you to practice those skills. This is also why we don't have time to go very deep into any of the topics.
Remember, everything you learn here is going to be useful in a SE-related career.
Also, consider this a gradual introduction to 'heavy' modules; most project modules you do after this are going to be much heavier :-p
How to reduce the workload? There are many activities worth only bonus points and there are other optional activities that you can omit to reduce workload. Those activities are useful only if you are aiming for a high-end SE career, CS2103 tutorships, recommendation letters from the module lecturer, to enroll in selective modules (e.g. CS3216/7), etc.
Why so much bean counting?
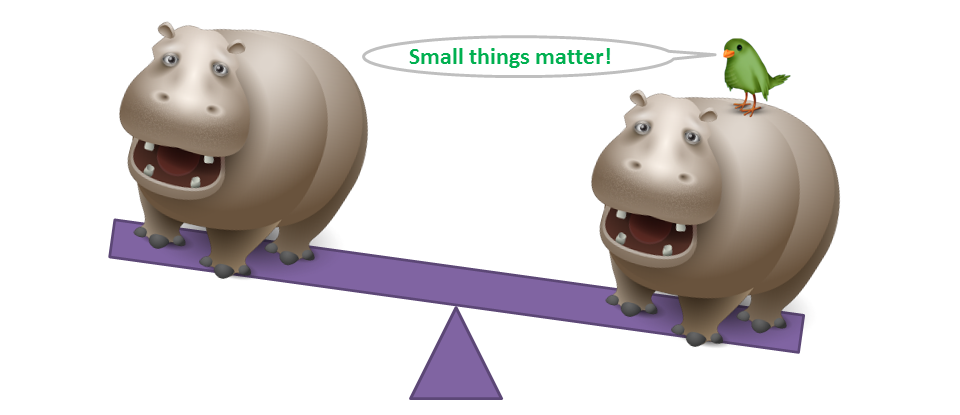
Sometimes, small things matter in big ways. e.g., all other things being equal, a job may be offered to the candidate who has the neater looking CV although both have the same qualifications. This may be unfair, but that's how the world works. Students forget this harsh reality when they are in the protected environment of the school and tend to get sloppy with their work habits. That is why we reward all positive behavior, even small ones (e.g., following precise submission instructions, arriving on time etc.).
But unlike the real world, we are forgiving. That is why you can still earn full 10 marks of the participation marks even if you miss a few things here and there.
Related article: This Is The Personality Trait That Most Often Predicts Success (This is why we reward things like punctuality).
Why you force me to visit a separate website instead of using IVLE?

We have a separate website because some of the module information does not fit into the structure imposed by IVLE.
On a related note, keep in mind that 'hunting and gathering' of relevant information is one of the skills you need to survive 'in the wild'. Do not always expect all relevant materials to appear 'magically' in some kind of 'work bin'.
Furthermore, unlike IVLE, a copy of the module website will remain online at http://www.comp.nus.edu.sg/~cs2103/AY1617S2/ for your reference for the next few years.
Why slides are not detailed enough, handouts are wordy?
Slides are not meant to be documents to print and study for exams. Their purpose is to support the lecture delivery and keep you engaged during the lecture. That's why our slides are less detailed and more visual.
Handouts are wordy because they are reference materials for you to study at your own pace and use during the module and later. The format is similar to materials (books, online articles, etc.) you will have to refer to when you work in the industry. They too are not meant to be cheat sheets 'to study for exams with minimal effort'.
Why so much self-study?

Self-study is a critical survival skill in SE industry. Lectures will show you the way, but absorbing content is to be done at your own pace, by yourself. In this module, we still tell you what content to study and also pass most of the content to you. After you graduate, you have to decide what to study and find your own content too.
Why do I have to come to tutorials on time?
Unlike most modules, our tutorials are group work. Arriving on time minimizes the time wasted by others waiting for you to arrive or briefing you on what you missed. Being punctual is expected from a professional.
What if I don't carry around a laptop?
If you do not have a laptop or prefer not to bring the laptop, it is up to you to show your work to the tutor in some way (e.g. by connecting to your home PC remotely), without requiring extra time/effort from the tutor or team members.
Reason: You enjoy the benefits of not bring the laptop; you should bear the cost too
Why very narrow project scope?
Defining your own unique project is more fun.
But, wider scope → more diverse projects → harder for us to go deep into your project. The collective know-how we (i.e., students and the teaching team) build up about SE issues related to the project become shallow and stretched too thinly. It also affects fairness of grading.
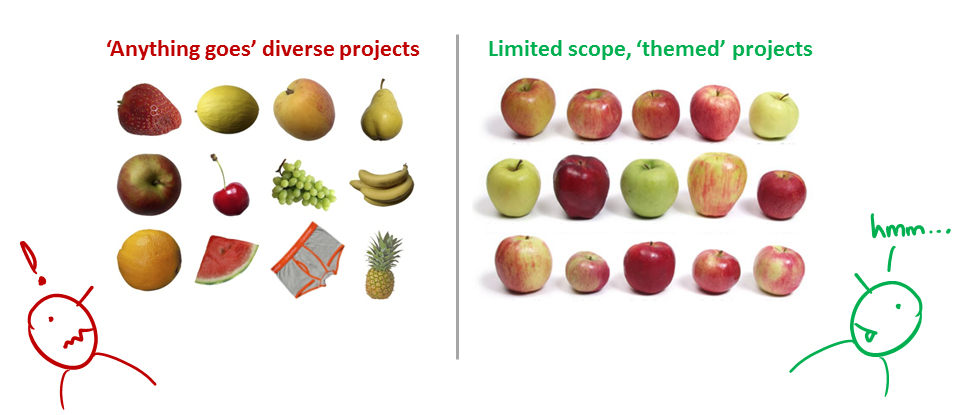
That is why a strictly-defined project is more suitable for a first course in SE that focuses on nuts-and-bolts of SE. After learning those fundamentals, in higher level project modules you can focus more on the creative side of software projects without being dragged down by nuts-and-bolts SE issues (because you already know how to deal with them). However, we would like to allow some room for creativity too. That is why we let you build products that are slight variations of a given theme.
Also note: The freedom to do 'anything' is not a necessary condition for creativity. Do not mistake being different for being creative. In fact, the more constrained you are, the more you need creativity to stand out.
Why project requirements are so vague?
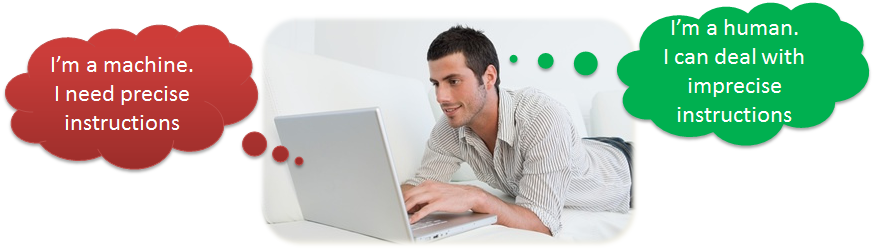
"You tell me exactly what to do - I do that - you pay me (in grades)" is a model for contract work, not for learning. Being able to survive in imprecise, uncertain, volatile problem contexts is precisely what we are trying to teach you.
For example, the best way to communicate something often depends on what is being communicated. That is why we don't specify the precise content for project documents. Instead, we aim to refine project documents iteratively. We believe the learning experience will be richer if we let you decide the best way to present your project information rather than just following our instructions blindly. For example, in real-life projects you are rarely told which diagrams to draw; that is a decision you have to make yourself.
Why I'm not allowed to use my favorite OS/IDE/etc?
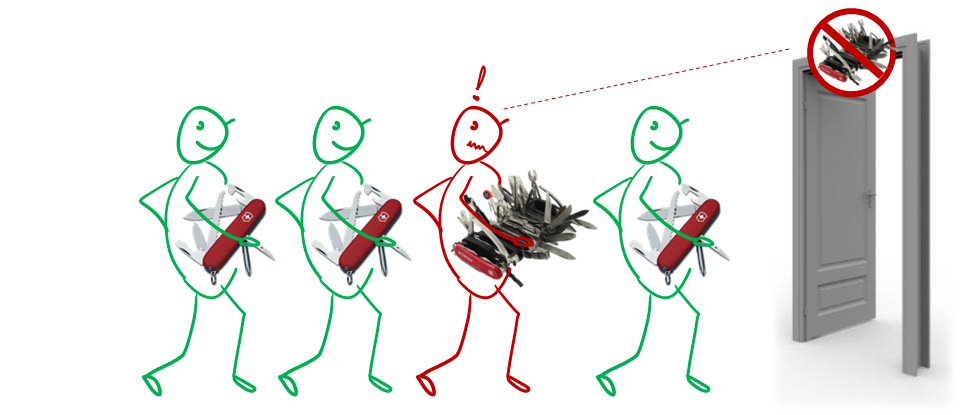
We have chosen a basic set of tools after considering ease of learning, availability, typicalness, popularity, migration path to other tools, etc. There are many reasons for limiting your choices:
Pedagogical reasons:
- We use 'good enough', not necessarily the best, tools: Most bleeding edge, most specialized, or most sophisticated tools are not suitable for a beginner course. After mastering our toolset, you will find it easy to upgrade to such high-end tools by yourself. We do expect you to eventually (after this module) migrate to better tools and, having learned more than one tool, to attain a more general understanding about a family of tools.
- Learn to thrive under given conditions: As a professional Software Engineer, you must learn to be productive in any given tool environment, rather than insist on using your preferred tools. It is usually in small companies doing less important
work that you get to chose your own toolset. Bigger companies working on mature products often impose some choices on developers, such as the project management tool, code repository, IDE, language etc. For example, Google uses SVN as their
revision control software. Sometimes this is due to cost reasons (tool licensing cost), and sometimes due to legacy reasons (because the tool is already entrenched in their code base).
While programming in school is often a solo sport, programming in the industry is a team sport. As we are training you to become professional software engineers, it is important to get over the psychological hurdle of needing to satisfy individual preferences and get used to making the best of a given environment.
Practical reasons:
- Some of the learning activities are tightly coupled to tools. Allowing more tools means tutors need to learn more tools, which increases their workload.
- We provide learning resources for tools. e.g. 'Getting started with Eclipse'. Allowing more tools means we need to produce more resources.
- When all students use the same tool, the collective expertise of the tool is more, increasing the opportunities for you to learn from each others.
Meanwhile, feel free to share with peers your experience of using other tools.
Why so many submissions?
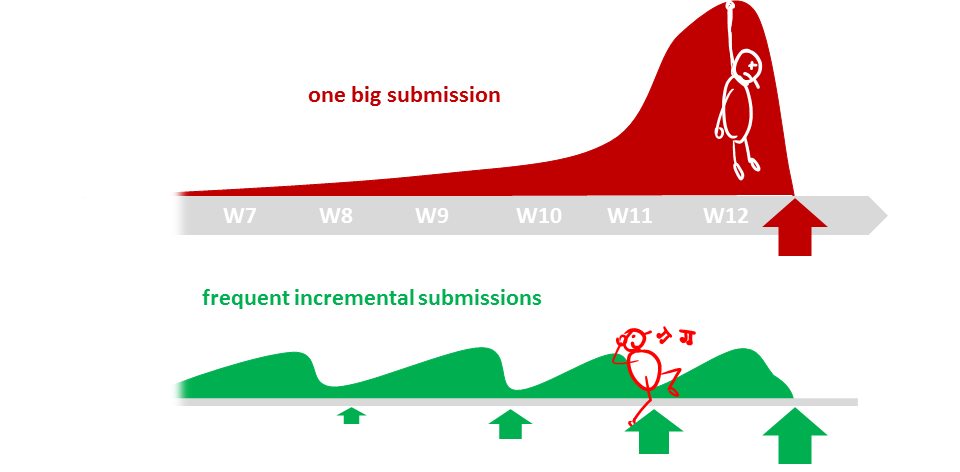
The high number of submissions is not meant to increase workload but to spread it across the semester. Learning theory and applying them should be done in parallel to maximize the learning effect. That can happen only if we spread theory and 'application of theory' (i.e., project work) evenly across the semester.
Why not enough marks for intermediate submissions?

Intermediate submissions are also incremental submissions. Intermediate submissions are included in the final submission too and will earn marks at that point. They are there to help you do well in the final submission and for us to monitor your progress and guide you accordingly. They are a means to an end. They are not achievements themselves. By right, they shouldn't be given marks at all. 😃
Why submission requirements differ between CS2103T and CS2101?
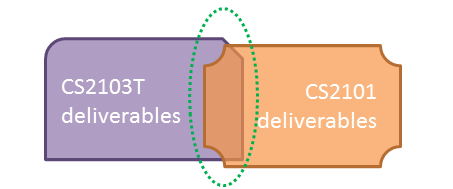
They do, and they should.
CS2103T communication requirements are limited to a very narrow scope (i.e., communicate about the product to users and developers). CS2101 aims to teach you technical communication in a much wider context. While you may be able to reuse some of the stuff across the two modules, submissions are not intended to be exactly the same.
Appendix D: How to get help in CS2103/T
In this module, we want to move you away from 'hand holding'. We want you to learn how to solve problems on your own. This is a vital survival skill in the industry and it needs practice.
|
Whether it is a technical problem (e.g. error when using Eclipse) or a doubt about a concept (e.g. what is the difference between scripted testing and exploratory testing?) the teaching team is happy to work with you when you look for a solution/answer. But we do not do it for you. Do not fire off an ‘SOS’ email to the lecturer/tutor right away. We discourage unconditional direct help because we want you to learn to help yourself. Yes, we believe in ‘tough love’. |
The question you should always ask yourself is, 'how do I solve this problem if the lecturer/tutors are not around to help me?'
Note: This guide is mostly about getting tech help, but it also applies to getting clarifications on module topics too. e.g. what is the difference between aaa and bbb?
What not to do: Email lecturer/tutor immediately after you encounter a problem or a doubt, unless it is something only the lecturer/tutor is supposed to know.
When faced with a technical problem or a doubt about a concept, here are the things you should do:
-
Check what is given: Check if the problem/concept has been discussed in the lectures, handouts, or the list of resources given to you. Yes it is easier for you to write an email to the tutor/lecturer instead, but that shouldn't be your default behavior. We know that sometimes it is difficult to find stuff in handouts/handbook etc. But you should try first.
-
Search: It is very likely the answer already exists somewhere in the cyberspace. Almost every programming-related question has been answered in places like stackoverflow. Don't give an opportunity for someone to tell you, 'Have you heard of a thing called Google?'.
Pay attention to the error message you encounter. Sometimes it also contains hints as to how to fix the problem. Even if not, a web search on the error message is a good starting point.
-
Ask peers:
Ask your team members.
Ask classmates using the IVLE forum. Asking questions in IVLE is encouraged. Even if you figured out one way to solve a problem, discussing it on IVLE might lead you to better ways of solving it, and will help other classmates who are facing similar problems too. If you are really shy to ask questions in IVLE, you may use this form to submit your question anonymously which we will then post in the forum.
Use Rubber Duck Debugging:
Rubber duck debugging is an informal term used in software engineering to refer to a method of debugging code. The name is a reference to a story in the book The Pragmatic Programmer in which a programmer would carry around a rubber duck and debug his code by forcing himself to explain it, line-by-line, to the duck.
[for more, see wikipedia entry]
-
Ask the world using programming forums such as stackoverflow.
Here are some tips for posting help request:
-
PLEASE search for existing answers before you post your question in those public forums; You don't want to appear as a 'clueless' or 'too lazy to do your research' person in a public forum.
-
Learn to isolate the problem. "My code doesn't work" isn't going to help even if you post the whole code online. Others don't have time to go through all of your code. Isolate the part that doesn't work and strip it down to the bare minimum that is enough reproduce the error. Sometimes, this process actually helps you to figure out the problem yourself. If not, at least it increases the chance of someone else being able to help you.
Tip: How to isolate problematic code? Delete code (one bit at a time) that is confirmed as not related to the problem. Do that until you can still reproduce the problem with the least amount of code remaining. -
Generalize the problem. "How to write tasks to a text file using Java" is too specific to what you are working on. You are more likely to find help if you post a thread called (or search for) "How to write to a file using Java".
-
Explain well. Conversations via online forums take time. If you post everything that is relevant to your problem, you chances of getting an answer in the first try is higher. If others have to ask you more questions before they can help you, it will take longer. But this doesn't mean you dump too much information into the thread either.
Tip: make sure you know what these stand for: RTFM, STFW, GIYF
-
-
Talk to the lecturer before or after the lecture. The lecturer will be at the lecture venue from 30 minutes before the start of the lecture.
-
Request our help: Failing all above, you can always request for help by emailing the lecturer.
Resources
- [lifehacker article] Google Tips and Tricks Every Student Should Know
- [Article] How To Ask Questions The Smart Way by Eric Steven Raymond
Appendix E: Using GitHub Project Hosting
Create a GitHub profile
Create a personal GitHub account.
- You are advised to choose a sensible GitHub username as you are likely to use it for years to come in professional contexts.
- Strongly recommended: Complete your GitHub profile. In particular,
- Specify your full name.
- Upload a suitable profile photo (i.e. a recent photo of your face).
The GitHub profile is useful for the tutors and classmates to identify you. If you are reluctant to share your info in your long-term GitHub account, you can remove those details after the module is over or create a separate GitHub account just for the module.
Submitting Pull Requests for tutorials
- Fork the repo to your personal GitHub account, if you haven't done so already.
- Create a branch named after tutorial activity e.g.
T2A2
Remember to switch to master branch before creating the new branch. - Commit your changes to that branch. Push to your fork.
- Create a Pull Request against the master branch of the repo
https://github.com/**nus-cs2103-AY1617S2**/{repo_name}
e.g.https://github.com/nus-cs2103-AY1617S2/addressbook-level1
(do not create PRs against the upstream repo atse-eduorg)

PR name should be:[ACTIVITY_ID][TEAM_ID]Your Name
e.g. If you are in team 1 of tutorial W09 (i.e. Wednesday 9am),[T3A2][W09-A1]James Yong
Note that our tutorial IDs are different from those shown in CORS/IVLE. Refer to the 'Tutorial Schedule' in the 'Overview' section of the Schedule Page. - Check the 'Files Changed' tab on GitHub to confirm the PR contains intended changes only.
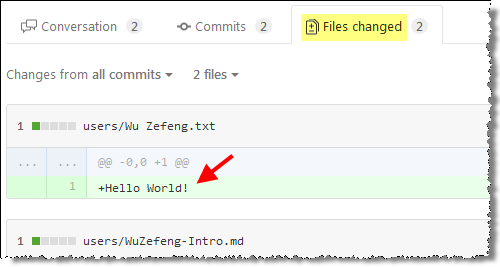
- If the content of the PR is not as you expected, you can fix those problems in your local repo, commit, and push those new commits to the fork. The PR content will update automatically to match new commits.
Alternatively, you can close that PR and create a new one with the correct content. - If your PR adapted/referred code from elsewhere (e.g. a stackoverflow post or a classmate's PR -- which is allowed, even encouraged), acknowledge the source in your PR description text.
e.g.Some code adapted from #2431 (I followed the same technique for parsing user command) - If the PR is not ready for review yet, add a comment
Work in progress. When the PR is ready for review later, add a commentReady for review
If there is no comment, we assume the PR is ready for review.
Organization setup
The instructions below are for setting up a GitHub organization for your team, which you should do at the start of Phase B.
You can create your GitHub account after receiving your phase B team ID. Here are the instructions (please follow the organization/repo name format closely because we use scripts to download your code. If the names are not as expected, our scripts will not work):
- One team member (e.g. team leader) should create an organization with the following details:
- Organization name :
CS2103AUG2016-TEAM_ID. e.g.CS2103AUG2016-W09-B3 - Plan: Open Source ($0/month)
- After that, the same person can add members to the organization:
- Create a team called
developersto your organization and give that team write permission. - Add your team members to the developers team.
Repo setup
Only one team member:
- Fork Address Book Level 4 to your team org.
- Rename the forked repo as
main. This repo is to be used as the repo for your project. - Clone the repo to your computer.
- Edit this element
<name>addressbook-level4</name>and the line below that in the.projectfile to match the product name (not repo name) of your project. e.g.SuperToDo
Commit the change. - Push to the
mainrepo you created above. - Ensure your team members have the desired level of access to your team repo
All team members:
- Clone to your Computer the
mainrepo your team member created in your team's GitHub org. - Set it up as an Eclipse project (follow the instructions carefully).
Note that some of our download scripts depend on the following folder paths. Please do not alter those paths in your project./src/main/src/test/doc
Issue tracker setup
When you create a repo, you get an issue tracker for that repo automatically. Configure it as follows:
-
Delete existing labels and add the following labels.
type.epic: A big feature which can be broken down into smaller stories e.g. searchtype.story: A user storytype.enhancement: An enhancement to an existing storytype.task: Something that needs to be done, but not a story, bug, or an epic. e.g. Move testing code into a new folder)type.bug: A bugstatus.ongoing: The issue is currently being worked on. note: remove this label before closing an issue.priority.high: Must dopriority.medium: Nice to havepriority.low: Unlikely to do
-
Create following milestones
-
V0.0,V0.1,V0.2,V0.3,V0.4,V0.5rc,V0.5 -
You may configure other project settings as you wish. e.g. more labels, more milestones
Project Schedule Tracking
In general, use the issue tracker (Milestones, Issues, PRs, Tags, Releases, and Labels) for assigning, scheduling, and tracking all noteworthy project tasks, including user stories. Update the issue tracker regularly to reflect the current status of the project. You can also use GitHub's new Projects feature to manage the project, but keep it linked to the issue tracker as much as you can.
Using Issues:
- Record each of the user stories you plan to deliver as an issue in the issue tracker.
e.g.Title: As a user I can add a deadlineDescription: ... so that I can keep track of my deadlines - Assign the
type.*andpriority.*labels to those issues. - When you start implementing a story, break it down to tasks. Define reasonable sized, standalone tasks. A task should be able to done by one person, in a few hours. e.g.
Good: Update class diagram in the project manual for V0.5
Bad (reasons: not a one-person task, not small enough): Write the project manual - Write a descriptive title for the issue.
e.g. Add support for the 'undo' command to the parser. - There is no need to break things into VERY small tasks. Keep them as big as possible, but they should be no bigger than what you are going to assign a single person to do within a week. So the user story
Implementing parseris too big because it cannot be done by a single person in a week. However,Implementing parser support for adding of floating tasksis of appropriate size. - Do not track things taken for granted. e.g., 'push code to repo' should not be a task to track. In the example given under the previous point, it is taken for granted that the owner will also (a) test the code and (b) push to the repo when it is ready. Those two need not be tracked as separate tasks.
- Omit unnecessary details. In some cases, the summary/title is enough to describe the task. In that case, no need to repeat it in the description. There is no need for well-crafted and detailed descriptions for tasks. A minimal description is
enough.
Similarly, labels such as 'priority' can be omitted if you think they don't help you. - Assign tasks to team members using the 'owner' field. At any point, there should be some ongoing tasks and some pending tasks against each team member.
- Use status labels to indicate which tasks are completed, which are ongoing, and which are to be done by next milestone.
Using Milestones:
- Use milestones to indicate which issues are to be handled for which milestone by assigning issues to suitable milestones.
- Set the deadlines for milestones (in GitHub). Your internal milestones can be set earlier than the deadlines we have set, to give you a buffer.
- Note that you can change the milestone plan along the way as necessary.
- IMPORTANT: To consider the milestone as 'reached', you should have the following done before the tutorial begins. 'Missed milestones' will count against the 'project management' component of your final grade:
- A working product tagged with the correct tag (e.g. V0.2) and pushed to the main repo.
- All tests passing on Travis.
- Milestone updated to match the product.
- Milestone closed. All issues assigned to that milestone should be closed too.
- Doing a 'release' on GitHub is optional for V0.1 and V0.2 but compulsory from V0.3.
Workflow
You may use any of the workflows described here and their variations. You can start with a simpler workflow first and move to more complex ones as necessary.
Here are some examples (ordered in increasing complexity):
- Members push to the
masterbranch (i.e. centralized workflow). - Members push to feature branches of team repo and merge when ready (i.e. feature branch workflow without PRs).
- Members push to feature branches of team repo and create PRs in team repo (i.e. feature branch workflow with PRs).
- Members fork the team repo to their own account, push code to their own fork, and then create PRs from their fork to team repo using either the centralized or the feature branch workflow.
Appendix F: What to do if there are teamwork issues
If your team is facing difficulties due to differences in skill/motivation /availability among team members,
- First, do not expect everyone to have the same skill/motivation level as you. It is fine if someone wants to do less and have low expectations from the module. That doesn't mean that person is a bad person. Everyone is entitled to have their own priorities.
- Second, don't give up. It is unfortunate that your team ended up in this situation, but you can turn it into a good learning opportunity. You don't get an opportunity to save a sinking team every day 😃
- Third, if you care about your grade and willing to work for it, you need to take initiative to turn the situation around or else the whole team is going to suffer. Don't hesitate to take charge if the situation calls for it. By doing so, you'll be doing a favor for your team. Be professional, kind, and courteous to the team members, but also be firm and assertive. It is your grade that is at stake. Don't worry about making a bad situation worse. You won't know until you try.
- Finally, don't feed angry or 'wronged'. Teamwork problems are not uncommon in this module and we know how to grade so that you will not be penalized for others' low contribution. We can use Git to find exactly what others did. It's not your responsibility to get others to contribute.
Given below are some suggestions you can adopt if the project work is not going smooth due to team issues. Note that the below measures can result in some team members doing more work than others and earning better project grades than others. It is still better than sinking the whole team together.
- Redistribute the work: Stronger programmers in the team should take over the critical parts of the code.
- Enforce stricter integration workflow: Appoint an integrator (typically, the strongest programmer). His/her job is to maintain the integrated version of the code. He/she should not accept any code that breaks the existing product or is not up to the acceptable quality standard. It is up to others to submit acceptable code to the integrator. Note that if the integrator rejected your code unreasonably, you can still earn marks for that code. You are allowed to submit such 'rejected' code for grading. They can earn marks based on the quality of the code. Also refer the workflow described in the 'A safer workflow using forks and pull requests' section of the Handbook: Appendix E (Using GitHub Project Hosting)
If you have very unreliable or totally disengaged team members :
- Re-distribute project work so that such team members cannot bring down the entire team.
- However, do not leave out such team members from project communications. Always keep them in the loop so that they can contribute more any time they wish to.
- Furthermore, evaluate them sincerely and fairly during peer evaluations so that they do get the grade their work deserves, no more, no less.
- Be courteous to such team members too. Some folks have genuine problems that prevent them from contributing more although they may not be able tell you the reasons. Just do your best for the project and assume everyone else is doing their best too, although their best may be lower than yours.