Fix a Bug
Fix a Bug
Bug fixes are a great way to improve MarkBind. As the project evolves, bugs are inevitably introduced, reported, and waiting to be fixed.
TLDR
- Triage
- Make experimental changes
- Add tests
- Update documentation
- Create PR & Follow up with the reviews
Triage
As bugs can be of varying complexity and involve different parts of the codebase, we will work through a concrete example of a fixed bug to illustrate the process.
Let's suppose we want to fix the bug reported in issue #1954.
The initial steps when a bug is reported are to:
- Read and understand the bug report.
- This is to ensure that the bug reported needs to be fixed.
- Make any necessary clarifications with the reporter.
- Reproduce the bug locally.
For practice, let's try to reproduce the bug locally. Run the following command to check out the commit before the bug was fixed:
git checkout 9bb130e1ddb8ac0686d2b7e45bc8b89b79fcb2e4
Now, let's use the test site generated in Explore MarkBind as a User to experiment with the bug.
- Read the steps to reproduce the bug in the bug report.
- Copy the markdown content from the bug report into the
contents/topic1.mdfile in the test site. - Run
markbind serve -dto serve the test site. - View the topic1 page in the browser, and observe the browser console output.
Checkpoint
Check that the following are true:
- The console output contains the error message
TypeError: Cannot read property null (reading 'classList')
In some cases, we will need to create a new test site to reproduce the bug. For example, if the bug is related to the MarkBind CLI and the site generation process.
Make Experimental Changes
Now that we have reproduced the bug, we can start tinkering with the code to fix it. This is the part that varies the most from bug to bug, as the bug may be related to different parts of the codebase. With our current setup, we can make changes to the codebase, serve the test site, and observe if the bug is fixed.
When editing files that are written in TypeScript, you will also need to run npm run build:backend in the root directory to compile these files.
For the given example, the required changes can be found here. In gist, changes
are made to packages/core/src/Page/index.js and packages/core/src/Page/page.njk to redefine how hasPageNavHeadings is computed and used.
Let's check out the commit that contains the fix:
git checkout 83a3c275732fa4127315b3730f791db5b2f29cb1
Now that we have applied the code logic changes, let's see if the bug is fixed.
- Run
markbind serve -dto serve the test site again. - View the topic1 page in the browser, and observe the browser console output.
Checkpoint
Check that the following are true:
- The console output no longer contains the error message
TypeError: Cannot read property null (reading 'classList')
Add tests
Now that we know exactly what the bug is and how to fix it, we can add a test to ensure that the bug does not reappear in the future.
We can also aim to be test-driven, where we write the test first, and then write the code to make the test pass.
In this case, we will add a functional test to capture the bug. The required changes can be found here.
The general steps are:
- Create a new page in the functional test suite in
packages/cli/test/functional/test_site/if necessary.- In this case, we will add a new page
testPageNavTarget.md.
- In this case, we will add a new page
- Add content to the page that reproduces the bug.
- Update the
site.jsonfile to include the new page.- This specifies the page source and gives it a title.
Let's check out the commit that contains the test:
git checkout c9368a35f8e2eb35ca71cabbe7e455fe05771215
Now that we have added the test, the test will necessarily fail. This is because the expected output is not yet updated to reflect the changes made to the functional test suite.
Checkpoint
Check that the following are true:
- Run
npm run testin the root directory to run the entire test suite. - See that the test fails.
At last, we need to update the expected output via npm run updatetest and commit the changes. You can see the committed changes here. The generated files may not be easy to read, but you should check that the generated content is reasonable (e.g. does not modify unrelated files).
Let's check out the commit that contains the updated expected output:
git checkout b64b632d359d41d9ca662fe15f1de665760becbf
Checkpoint
Check that the following are true:
- Run
npm run testin the root directory to run the entire test suite. - See that the test passes
Update Documentation
If the bug is related to a feature that is documented, we should update the documentation to reflect the changes. This is especially important if the bug fix changes the behavior of the feature.
In this case, we will not need to update the documentation.
Create PR & Follow up with the Reviews
Now that we have completed our changes, we can create a PR to merge the changes into the master branch.
Similar to Contribute to Documentation, we will need to:
- Fill in the pull request template.
- Wait for the CI checks to pass.
- For first-time contributors, you may need to wait for the MarkBind team to approve your PR before the CI checks can run.
- Verify that the PR preview is working.
- The PR preview is generated by netlify/markbind-master/deploy-preview.
- You can find the link to the PR preview in the checks section of the PR.
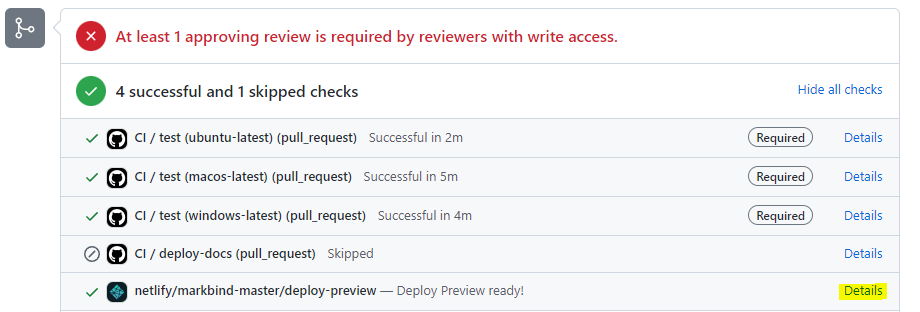
- Open the link to the PR preview and ensure that your changes are reflected in the rendered site
- Follow up with PR reviews and make changes as requested.
For changes that involve code logic, some discussion may be required to determine the best way to fix the bug. Hence, it may be helpful to get feedback early either by creating a draft PR or by discussing the approach in the issue thread.
Summary
In this task, you have learned how to deal with a bug report. While the example bug report is simple, the steps are generally the same for more complex bug reports.
Here are some additional tasks for you to try out:
- Review issue #1954 and PR #2054 for the example bug report and fix.
- Look through closed bug reports and see how they were fixed.
- Triage open bug reports and see if you can fix them!
When you are ready, move on to learn how to implement a new feature!