Implement a New Feature
Implement a New Feature
Creating a new feature makes MarkBind more useful and powerful. This section will guide you through the process of implementing a new feature.
TLDR
- Feature proposal
- Design & iterate
- Add tests & update documentation
- Create PR & Follow up with the reviews
Feature Proposal
Creating a new feature starts with a feature proposal. This can come from you, or from a user who has requested a new feature in the issue tracker. At this stage, the feature proposal should be discussed extensively to ensure that the feature is well-defined and that it is something that MarkBind should support. There are also enhancements to existing features that can be proposed (see here) and worked on.
In this part, we will be mentioning a few completed PRs as examples of how a feature was implemented. You can use them as a reference to get a better idea of how a feature is implemented.
Issue #983 is an example where a proposed feature was worked on in PR #985 but later closed due to a potential lack of user value.
Design & Iterate
When there is consensus on the feature proposal, we can start designing the feature. This involves understanding how MarkBind works and how a feature can be implemented. In the broadest sense:
- Additional Markdown-like syntax can be added by tapping into markdown-it which does Markdown parsing and rendering.
- e.g. issue #900 and PR #1657
- Dynamic components can be created via Vue.js.
- e.g. issue #898 and PR #1858
- Creating default or optional plugins can be done with our plugin system.
- e.g. issue #1754 and PR #1824
- And more!
- e.g. issue #1946 and PR #1947
Add Tests & Update Documentation
(Same as what we mentioned in the previous task)
By this time, you should have a good idea about how tests and documentation are written. Where possible, unit tests should also be added to ensure that the feature works as expected. Utilizing the new feature in our documentation is also encouraged so that we can get a better idea of how the feature can be used.
When adding intra-site links, use tags to differentiate between the deployment environment when appropriate, as mentioned in Adding Intra-Site Links to Documentation!
Create PR & Follow up with the Reviews
(Same as what we mentioned in the previous task)
- Fill in the pull request template.
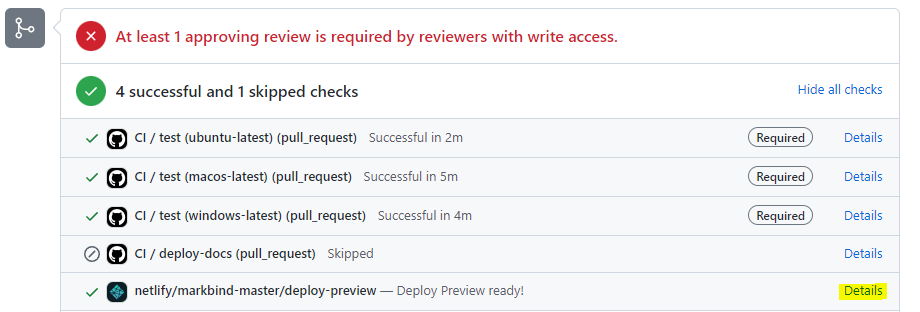
- Wait for the CI checks to pass.
- For first-time contributors, you may need to wait for the MarkBind team to approve your PR before the CI checks can run.
- Verify that the PR preview is working.
- The PR preview is generated by netlify/markbind-master/deploy-preview.
- You can find the link to the PR preview in the checks section of the PR.
- Open the link to the PR preview and ensure that your changes are reflected in the rendered site
- Follow up with PR reviews and make changes as requested.
For features, it is also crucial to get early feedback on implementation details. This is because some considerations may need to be exercised when introducing new user-facing syntax. Another problem is that the implementation may not be the most appropriate or straightforward one, sometimes due to how existing code is structured.
Issue #1475 is an example where the work in PR #1988 involved changing the implementation midway.
Summary
In this part, we have reviewed the steps to implement a new feature. Working on a new feature can be a daunting task, but it is also very rewarding to own a feature from start to finish.
Here are some additional tasks for you to try out:
- Look through the mentioned PRs and try to understand how the features were implemented.
- Look through the issue tracker and see if there are any features that you would like to work on.
And...that's it!🚀🚀🚀
You have completed the bootcamp! Take a well-deserved rest and we look forward to your contributions!