Explore MarkBind as a User
Explore MarkBind as a User
Getting to know MarkBind as a user will help you understand what MarkBind offers and how it can be used to create static websites. This will also help you understand the different components and syntax available in MarkBind, which will be useful when you want to debug issues or create similar features in the future.
TLDR
- Setup the master branch MarkBind
- Create a MarkBind site
- Create content with MarkBind
- Modify site structure and configuration
- Deploy your MarkBind site
Setup the master branch of MarkBind
As mentioned in our user guide, we can either install MarkBind via npm or create a new MarkBind site with npx.
In this bootcamp, we want to set up the master branch MarkBind so that we can test out any changes we make to the codebase on our local machine.
You can also switch between the master branch MarkBind and check out other branches if you are working on multiple issues. This is also useful when you want to test out a PR submitted by another developer.
Checkpoint
After setting up MarkBind, try running from the root directory of your MarkBind repository:
-
markbind -vto check that you have the correct version of MarkBind installed -
cd docs && markbind serve -dto check that you can serve the MarkBind documentation site in development mode
If you can browse the MarkBind documentation site that should have automatically been up in your browser at http://localhost:8080, you have successfully set up MarkBind!
Create a MarkBind site
With MarkBind installed, we can now create a new MarkBind site.
We recommend that you set up a new repository for this MarkBind site so that you can push your site to GitHub pages later. This MarkBind site can be used to test out any changes you make to the codebase.
As an example, let's create a test site together!
- Create a new folder called at a location outside of the MarkBind source code directory.
- Go to the folder and run
markbind initto create a new MarkBind site with the default template. - Initialize a new git repository in the folder by running
git init. You can also create a new public repository on GitHub first and clone it to your local machine.
You should see the following output:
$ markbind init
__ __ _ ____ _ _
| \/ | __ _ _ __ | | __ | __ ) (_) _ __ __| |
| |\/| | / _` | | '__| | |/ / | _ \ | | | '_ \ / _` |
| | | | | (_| | | | | < | |_) | | | | | | | | (_| |
|_| |_| \__,_| |_| |_|\_\ |____/ |_| |_| |_| \__,_|
v4.0.2
info: Initialization success.
Checkpoint
After setting up the MarkBind test site, try running the following common operations from the root directory of your test site:
- Build the site by running
markbind build - Serve the site by running
markbind serve - Serve the site in development mode by running
markbind serve -d
You now have the test site up and running!
Create Content with MarkBind
MarkBind contains a range of additional syntax on top of Markdown. It also comes with a set of components that can be used to create content.
Two essential sections of the user guide to get started with are:
- Formatting Contents - Covering Markdown & Markdown-like syntax.
- Using Components - Covering MarkBind components (Built with Vue.js or Native HTML).
The generated MarkBind site from the above step also includes a few sample usage in the index.md file.
Now, let's try editing the index.md file to add some content of our own!
- Open the
index.mdfile in yourmb-dev-xxxfolder. - Replace the wording
Landing Page TitlewithMarkBind Developer Test Site. - Modify or add some content utilizing one or more of the following syntaxes:
- Text Styles
- Code Block
- Emoji
- etc.
- Modify or add some content utilizing one or more of the following components:
Checkpoint
With live preview, you should be able to see the changes you have made to the site after saving. Check that the following are true:
- Serve the site by running
markbind serve -d - Make changes to the
index.mdfile and save - See the changes reflected in the live preview, with the correct rendering of the syntax and components
You now have created content with MarkBind!
Modify Site Structure and Configuration
There are a few ways to modify the site's (as well as the page's) structure and configuration. We will cover the following:
Let's continue with the test site we created earlier and modify the index.md file via frontmatter.
- Open the
index.mdfile in yourmb-dev-xxxfolder. - Change the
pageNavTitlein the frontmatter fromTopicstoIndex Page. - Change the
pageNavin the frontmatter from4to5.
Checkpoint
Ensure that you are still serving the site with markbind serve -d. Check that the following are true:
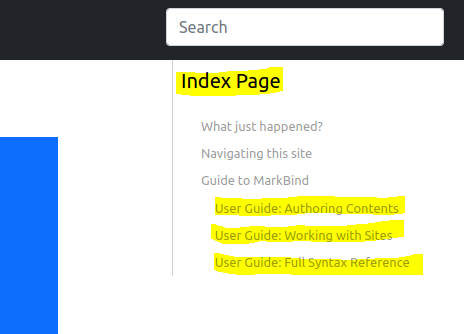
- The rendered page navigation title is changed to
Index Page - The rendered page navigation content now shows
H5headings as well
Screenshot before the changes:
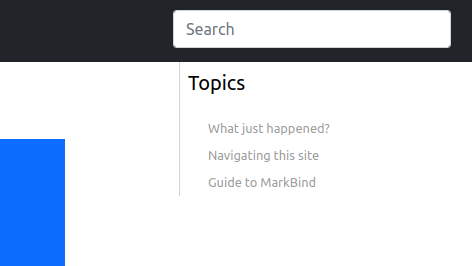
Screenshot after the changes:
Another commonly adjusted structure is the layout of the site (especially, the site's top header and the left-hand-side navigation).
- Open the
_markbind/layouts/default.mdfile in yourmb-dev-xxxfolder. - Change
Your LogotoMarkBind Developer Test Site. - Change
Home :house:toMy Test Playground :computer:.
Checkpoint
Ensure that you are still serving the site with markbind serve -d. Check that the following are true:
- The rendered page logo in the header is changed to
MarkBind Developer Test Site - The rendered site navigation title is changed to
My Test Playground💻
Screenshot after the changes:
![]()
Lastly, let's modify the site configuration to change the site title and more.
The site.json file is autogenerated and located in the root directory of the site. Refer to the User Guide - site.json section for more details.
- Open the
site.jsonfile in yourmb-dev-xxxfolder. - Change
"titlePrefix": "",to"titlePrefix": "mb-dev-xxx",. - Under
pages, add"title": "Home".
Checkpoint
Ensure that you are still serving the site with markbind serve -d. Check that the following are true:
- The page title in the browser tab is changed to
mb-dev-xxx - Home
Screenshot after the changes:

You now have modified some of the commonly adjusted site structure and configuration!
Deploy your MarkBind site
MarkBind sites can be easily deployed with CLI commands or via CI. Let's try deploying our site via GitHub Actions.
- Open the
site.jsonfile in yourmb-dev-xxxfolder. - Change
"baseUrl": "",to"baseUrl": "/mb-dev-xxx",(Note the leading/and that the value is the same as your GitHub repository name). - Create a
.github/workflows/deploy.ymlfile with the following content mentioned in the GitHub Actions guide.- Note that you should change
branches: mastertobranches: mainif you are using themainbranch.
- Note that you should change
- Ensure that you have added your remote GitHub repository to your local repository with the following command (replace
xxxwith your GitHub username):git remote add origin https://github.com/xxx/mb-dev-xxx.git - Commit and push the changes to the
mainbranch with the following commands:git add . git commit -m "Update content" git push origin main - Update your GitHub repository setting for deploying to GitHub Pages.
- Navigate to the Settings > Pages section on GitHub for that repository and set the source to
Deploy from a branchand the branch togh-pagesand/(root).
- Navigate to the Settings > Pages section on GitHub for that repository and set the source to
Checkpoint
Check that the following are true:
- The triggered GitHub action runs are successful
- The site is deployed and available at
https://<username>.github.io/mb-dev-xxx/(after a few seconds to a few minutes)
Congratulations! 🎉🎉🎉 You have deployed your MarkBind site!
Summary
In the first part of this bootcamp, we experimented with MarkBind as a user. We have set up the master branch of MarkBind and created a new MarkBind site. We have also created content with MarkBind components/syntax and deployed our site.
Here are some additional tasks for you to try out:
- Create a new MarkBind site with a different theme
- Try out MarkBind's include mechanism
- Create a dedicated MarkBind site for your personal usage and share it with us
- You can see some examples in the MarkBind showcase
Take a break now ☕️ and we will continue with the second part of the bootcamp!