Project management
Project management
This page contains information about project management tasks. The target audience is senior developers (and above).
Managing PRs
For general best practices, refer to the guide Working with PRs @SE-EDU.
Approval
If the PR is very simple (e.g. correcting a simple typo), one approval is sufficient for merging. Other PRs need two approvals.
Once the second approval is given from a senior developer (or there are >= 3 approvals given from anyone), the PR can be merged immediately.
If there is no second approval yet, wait for a day before merging the PR without the second approval.This is to allow other developers the chance to review the PR, and delay the merge if there's any significant problems. Not everyone is available all of the time, so please be patient.
As part of the PR review process, use the Codecov report generated by the CI pipeline to assess whether the proposed changes significantly degrade test coverage. Depending on the severity of the degradation, you may have to check the cause and address it accordingly.
Note that code coverage degradation may result in a false-positive CI failure on the
masterbranch.
Merging
Re-sync the PR branch with master to trigger the CI pipeline.
Rationale: This is because we do not ask PR authors to rebase their PRs, but the master branch may have since been updated. It is possible for tests to pass on their branch, only to fail when integrating the changes with the master
This is possible even if GitHub doesn't complain about any merge conflict!
Merge the PR.
Refer to the guide Working with PRs @SE-EDU on which merge strategy to use.
- The default strategy is to do a squash-merge.
- Use a merge commit if
- the commits are well-organized, and the branch tackles only one task. This would typically be a PR tackling a substantial issue requiring multiple dependent and successive changes.
- Use a rebase-merge if
- the commits are well-organized, and each commit is an independent task. This should be extremely rare as we typically advise that PRs should not have unrelated changes. An example can be found here.
Format for the merge/squashed commit title:
PR_TITLE (#PR_NUMBER)
Add built-in support for light themes from bootswatch (#745)For non-trivial PRs, ensure that there is a sensible commit message accompanied by it. Both the title and the body should follow the Git conventions @SE-EDU.
Before confirming the merge, do ensure that no other PRs have been merged to master since the time you started drafting the merging commit's title and message. Otherwise, you may face a glitch where GitHub merges your PR without squashing. (Reference: MarkBind#1160)
Use the r.Major/Minor/Patch label to tag the PR.
Reason: The release manager may not review all PRs, so please add the label to highlight the version impact of the PR.
Draft the release note for breaking changes.
Reason: The release manager may not have the full details of the PR, so please work with the PR author to prepare a release note (if applicable) in the PR description.
Tip: how to undo an accidental merge commit.
- In the event of a wrong commit strategy chosen, you can undo the merge to master by:
- Switch to the master branch locally.
- Run
git reset --hard HEAD~1. - Run
git push --force. - Create a new PR from the previous PR branch and merge the PR with the correct merge strategy.
Note: The above should be performed with caution as force pushing rewrites the Git history, which might cause conflicts with any on-going work. You would also need write/push access to master.
- In the event of a wrong commit strategy chosen, you can undo the merge to master by:
Doing a Release
Make sure you have the correct permissions for MarkBind's GitHub repository and npm organization.
For GitHub, you need rights to push to master branch and make new releases.
- To check if you can make a new release and push to master branch, go to the release page and check for the "Draft a new release" button. If missing, you may not have permissions for a release.
For npm, you need to be in the MarkBind organization.
- To check if you are in the MarkBind organization, go to your npm profile and check if MarkBind is listed under organizations.
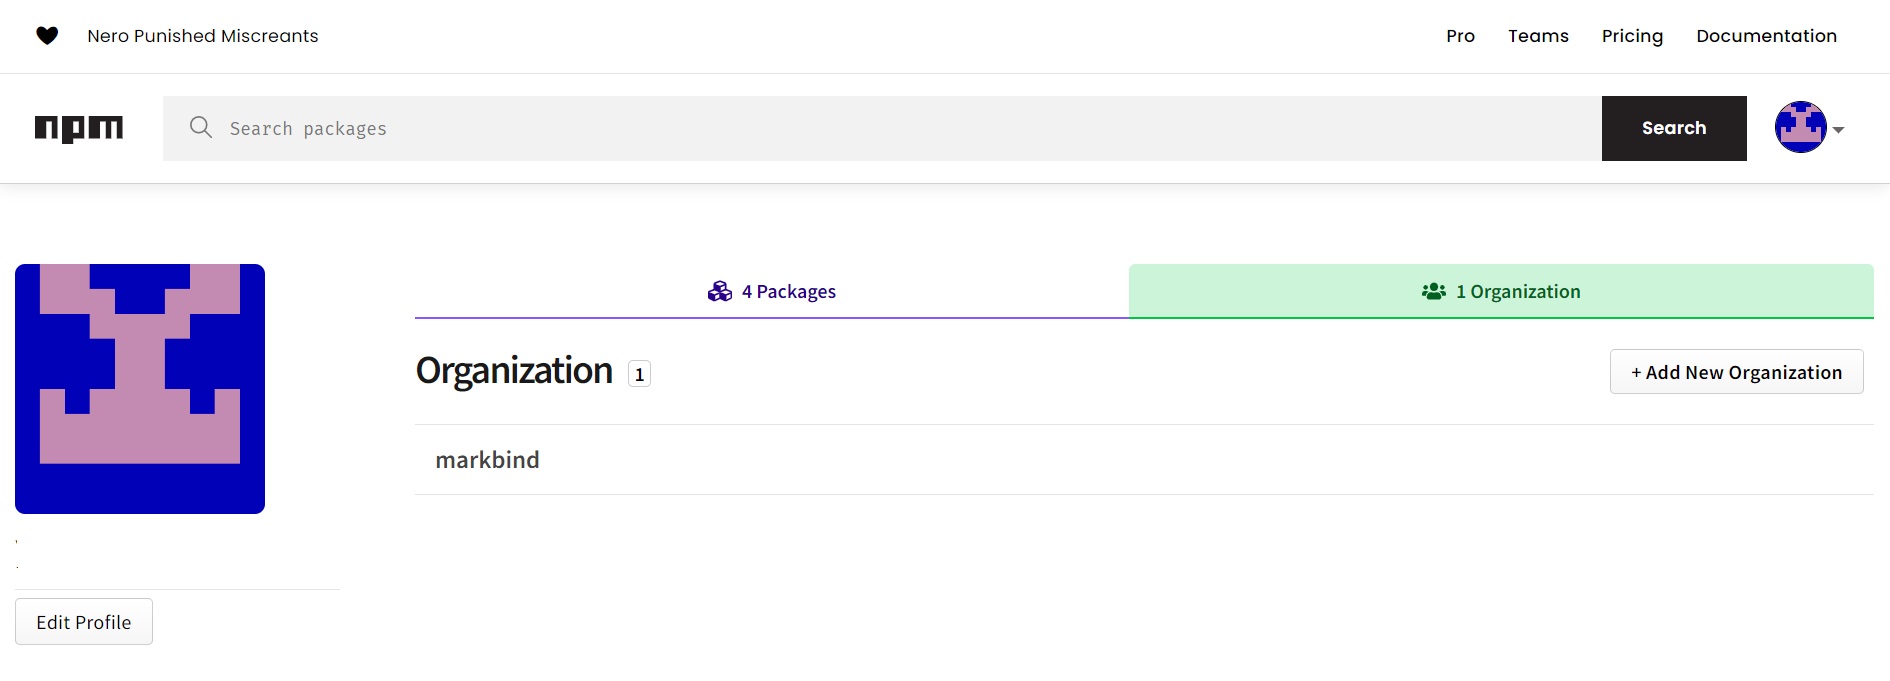 Example of profile that has been added to Markbind organisation
- There should be 4 packages listed under the organization,
markbind-cli,@markbind/core,@markbind/core-weband@markbind/vue_components. - Notably, the first three are packages that we publish every release while the last one has since become a private package consumed internally.
- To check if you are in the MarkBind organization, go to your npm profile and check if MarkBind is listed under organizations.
Login to your npm account in your terminal by running
npm login.Make sure to start with a "clean slate" by running
npx lerna cleanand thennpm run setupin the root MarkBind directory.Increment the version number by running
npx lerna version --no-push --exact. Which to increment (patch,minorormajor) depends on what PRs are merged for the new version, which means you must know beforehand about the changes.- Double check that the PRs are appropriate for the new version. Review the definition of SEMVER and the impact of the PRs.
- We will specify updated version numbers exactly to ensure that each version will consistently fetch the same versioned internal packages.
- The end result of this command is version commit with an appropriate tag. We will make use of the generated tag and commit message later.
- Do not push this commit to the remote repository yet.
Rerun
npm run setupto ensure that the updated version numbers are reflected in the packages.- This is to ensure that the updated version numbers are reflected in the built distribution folder
dist. - This is because the version number is updated in the
package.jsonfile of the packages in the previous step, andnpm run setupwill copy the updated file into the built distribution folderdist.
- This is to ensure that the updated version numbers are reflected in the built distribution folder
Build the core-web package bundle by executing
npm run build:webin the root directory, after which you should see changes in the bundles located inpackages/core-web/dist.
Take a peek at the diff for the bundles to see if there are any strange changes.- If there were no changes to the files in
packages/core-weborpackages/vue-componentssince the last release of MarkBind, you may observe no changes. Simply proceed with the rest of the steps. - If there are font files in the diff, and you are sure that there were no changes to the font files, you may ignore & discard the changes.
- Typically, the following files will be updated:
markbind.min.jsmarkbind.min.cssvuecommonappfactory.min.jsvuecommonappfactory.min.css
- If there were no changes to the files in
Rebuild the test files using
npm run updatetestWhen rebuilding the expected test files, ensure that only the version number is updated for the output
.htmlfiles. For example, this is correct:diff --git a/test/functional/test_site/expected/bugs/index.html b/test/functional/test_site/expected/bugs/index.html index 779f279..bb3c602 100644 --- a/test/functional/test_site/expected/bugs/index.html +++ b/test/functional/test_site/expected/bugs/index.html @@ -4,7 +4,7 @@ <meta name="default-head-top"> <meta charset="utf-8"> <meta http-equiv="X-UA-Compatible" content="IE=edge"> - <meta name="generator" content="MarkBind 1.20.0"> + <meta name="generator" content="MarkBind 1.21.0"> <meta name="viewport" content="width=device-width, initial-scale=1"> <title>Open Bugs</title> <link rel="stylesheet" href="../markbind/css/bootstrap.min.css">If any other lines changed, that likely means the functional tests weren't updated in a pull request. Do revert everything done so far, and make a pull request specifically to fix that first!
If core-web package bundle was updated earlier: also ensure that the updated bundles are copied to each of the expected test site's folders.
- We do this for each MarkBind release (rather than require contributors to update the bundles for each affected PR), in order to reduce unnecessary merge conflicts. It also makes it easier for the maintainers to vet the changes.
- Typically, the bundle will be updated automatically in the expected test site's folders after running
npm run updatetestin the previous step.
Combine the changes that you made in the last two steps with the version commit generated by
lerna version. To do so, amend the version commit and version tag by doing the following — take note to changevA.B.Cto the new version.$ git commit -a --amend --reuse-message vA.B.C $ git tag --force vA.B.C # to reassign the tag to the newly amended commitPush the new commit and version tag generated by
npm(changevA.B.Cto the new version's string accordingly).$ git push upstream master $ git push upstream vA.B.CPublish by running
npx lerna publish from-git. You should receive a notification bynpmthat the publish is successful.Smoke test the new version by installing the new version (run
npm i -g markbind-cli@A.B.C) and playing around with it a bit to ensure that it works.- If you used
npm linkfor your project, ensure that you try the new release on another platform that doesn't usenpm link, so that we can be sure the end-users can install and use the new version. - You can also try the new release on a project that uses MarkBind as a local dev-dependency.
- If you used
Verify the website at markbind.org has been updated. For example, you can look at the footer of the website to see if the version number is updated.
Note that it may take a few minutes for the website to be updated and you may need to check it in an incognito window to avoid caching.
The deployment is automated. However, if it doesn't deploy properly for the release, do the following:
$ npm run deploy:ugRelease on GitHub.
a. Go to the MarkBind release page at https://github.com/MarkBind/markbind/releases.
b. Click "Draft a new release".
c. For the tag version, enter
vA.B.C. (The newly released version should be recognized by GitHub, with an "Existing Tag" indicator, otherwise, ensure that you have pushed the version commit and tag in step 4).d. For the release title, leave it blank.
e. Press the "Generate release notes" button to automatically add the list of PRs merged for this release.
f. For the main body, use the following template:
# markbind-cli <!-- List out each of the PR for this version in the following format: --> <!-- PR_TITLE by @username in #PR_NUMBER --> ## User Facing Changes ### Breaking Changes <!-- Any feature that is made obsolete --> > Also give a brief explanation note about: > - what was the old feature that was made obsolete > - any replacement feature (if any), and > - how the author should modify his website to migrate from the old feature to the replacement feature (if possible). ### Features <!-- Features enable users (authors/readers) to do something new. --> ### Enhancements <!-- Enhances any existing features --> ### Fixes <!-- Fixes correct a programming error/assumption. --> ### Documentation <!-- Pure changes to the documentation, such as typo, restructuring, etc --> ## Developer Facing Changes ### Code Quality <!-- Refactoring, etc. --> ### DevOps Changes <!-- Tooling, etc. --> ### Dependencies <!-- Dependency version upgrades of the main or any subpackages --> ### Miscellaneous <!-- Any other changes -->Thoroughly review and categorize each PR to its appropriate section within the release notes. If needed, provide additional explanations for clarity. Any sections without a corresponding PR can be omitted.
An example of a release note draft (taken from v1.18.0):
# markbind-cli ### Breaking Changes #653 Disable decamelize for anchor ID generation (#667, MarkBind/vue-strap#95) > Headings with PascalCase wordings now generate a different anchor ID in order to be more compatible with anchor IDs generated by GitHub Flavored Markdown. > > For example, if we have the following heading: > > ```markdown > # MarkBind docs > ``` > > Old anchor id: > > ``` > mark-bind-docs > ``` > > **New** anchor id: > > ``` > markbind-docs > ``` > ### Features #457 Add `deploy -t/--travis` to deploy via Travis (#649) #470 Support custom MarkBind plugins (#474) #642 Support specifying include variables inline (#681) ### Enhancements #369 Seamless panels: omit caret if not expandable (MarkBind/vue-strap#96) #657 Add temporary styles to prevent FOUC (#664) ### Fixes #651 Exit MarkBind with non-zero exit code on fatal error (#679) ### Documentation Restructure user docs on MarkBind syntax (#668) Add documentation for badges (#686) Fix filename capitalization for syntax documentation (#685) ### Code Quality test: Add diff printing for easier debugging (#632) ### Dependencies Bump acorn from 7.1.0 to 7.1.1 in /packages/core (#1120)f. Click "Publish release".
Announce the new release on our Slack channel (replace
A.B.Cwith the new version). Congrats!Published:
npm i -g markbind-cli@A.B.C
Acknowledging Contributors
This project follows the all-contributors specification.
View all contributors
Besides the contributors list provided by GitHub, the list of all MarkBind contributors is available in README.md.
The table shown in README.md is based on the entries from .all-contributorsrc.
Add new contributors
To simplify the process, use the all-contributors bot that has been installed in the repository to trigger a PR that will add a new contributor.
Example workflow:
- A new contributor 'tlylt'(GitHub username) has opened a PR to committed code changes to the repository.
- A senior dev reviews and approves the PR.
- The senior dev comments in that PR with the line "@all-contributors please add tlylt for code" to trigger an automatic PR that will apply relevant changes
to include 'tlylt' in
.all-contributorsrcandREADME.md. - The senior dev approves and merge the automatic PR.
- The senior dev deletes the automatic PR.
Note that:
- All contribution types specified here can be used.
- E.g. code, doc, mentoring, question, test, bug
- Multiple contribution types can be included at once or updated later on.
- E.g. "@all-contributors please add tlylt for code, doc"
- Contribution types can be updated later on.
- E.g "@all-contributors please add tlylt for code"
- Some time later: "@all-contributors please add tlylt for doc"
- Result: 'tlylt' will be updated to have both icons(code and doc)
Managing the repository
Projects
As the number of issues increases, prioritising and triaging work may become more tricky even with labels. We may want to prioritise certain issues for particular version releases, or to work towards an overall vision of MarkBind. For this purpose, it may be useful to use GitHub Projects.
Instructions:
- Read through the issues in the repository to understand what's in the backlog.
- Decide what goals the team is working towards. Examples: "Better Logging", "Necessary Updates", "User Demand", "Bugfix", and "Developer Experience".
- Create the GitHub project (keeping in mind how long it should take) and update the project details.
- Add relevant issues to the project and use it to track progress.
Some tips / principles from current use:
- Don't treat the project as a strict guide, only a tool to prioritise tasks and discover issues to work on. If another issue catches your fancy or an urgent fix comes up that is not on the roadmap, you can work on that instead.
- These projects are "product roadmaps" to help teams communicate and collaborate.
- This roadmap tracks some bigger issues that MarkBind aims to focus on.
- The main goal is to triage issues and perhaps track progress in the repository perhaps on a yearly basis.
- You can triage issues into more than just "todo" - this roadmap used in 2024 into "KIV/Discussion", "Todo", and "Implementation Needed"; the latter is used for issues that are very straightforward, while the first was used for issues where the precise implementation might require some discussion or be more complex.
- You can write project details to clarify your project organisation.
- You can use multiple views, such as Kanban, tables, or calendar, depending on what best suits your needs.
- You can use custom fields - this roadmap used in 2024 categorised the issues into bigger picture goals that were set earlier.
Managing GitHub Teams
About GitHub Teams: Teams is used to manage admin, read and write access, and for sending notifications. Organization members can send notifications to an entire team by mentioning the team's name.
To ensure efficient project management and code reviews, we organize contributors into GitHub teams with varying levels of access. Teams are used to logically identify and assign roles and permissions in the MarkBind organization and @mention them as needed.
Team Structure
We group teams into three main categories based on their role and access rights.
Maintainers (Maintain Access)
maintainers: Parent team for permissions.team-leads: Mentors and Team Leads.release-manager-admins: Core members responsible for releases.
Developers (Write Access)
developers: Parent team for permissions.junior-developers: Contributors with write access who are building familiarity with the codebase.senior-developers: Experienced developers with deep codebase knowledge.
Contributors (Triage Access)
active-contributors: Regular contributors (for pinging).
Note: GitHub Roles are split into Read, Triage, Write, Maintain, and Admin.
Contributor Journey
The following flowchart illustrates how contributors move between teams as they progress in experience and responsibility.
flowchart LR
    %% Entry Points
    New[New Contributor] -->|Consistent Contribution| Active[active-contributors]

    %% Developer Path
    Active -->| | JrDev[junior-developers]
    JrDev -->|Demonstrated Expertise| SrDev[senior-developers]

    %% Leadership Path
    SrDev -->|Leadership Role| Leads[team-leads]
    SrDev -->|Release Management| RM[release-manager-admins]

    subgraph Maint [Maintainers Group]
        direction TB
        Leads
        RM
    end

    subgraph Devs [Developers Group]
        direction TB
        JrDev
        SrDev
    end

    %% Styling
    style New fill:#fff,stroke:#333,stroke-dasharray: 5 5
    style Active fill:#e1f5fe,stroke:#01579b
    style JrDev fill:#fff9c4,stroke:#fbc02d
    style SrDev fill:#fff9c4,stroke:#fbc02d
    style Leads fill:#ffebee,stroke:#b71c1c
    style RM fill:#ffebee,stroke:#b71c1c
    style Maint fill:#ffebee,stroke:#b71c1c,stroke-dasharray: 5 5
    style Devs fill:#fff9c4,stroke:#fbc02d,stroke-dasharray: 5 5
Contributors typically start by consistently contributing to the project, joining the active-contributors team. As they demonstrate familiarity with the codebase and build trust through merged PRs, they are promoted to junior-developers to gain write access.
With continued high-quality contributions and expertise, members advance to senior-developers. Those who take on significant responsibilities, such as mentorship or release management, may then assume leadership roles within the team-leads or release-manager-admins teams.
Team Maintenance
To ensure the team structure remains effective and secure, MarkBind organization members and team maintainers should regularly review and update the team rosters (e.g., at the start, mid, and end of each semester or year).
Maintenance Steps:
- Review Activity: Identify members who have become inactive or whose contribution level has changed.
- Promote Members: Move eligible members up the hierarchy (e.g., from
active-contributorstojunior-developers) based on the Contributor Journey. - Audit Team Membership: Ensure there are no "floating" members (members in parent teams like
developersbut not in any child team). - Update the About page to reflect the current team structure and roles. Shift inactive members to the
Past Memberssection, and assign appropriate roles to the active members (e.g. Project Mentor, Team Lead, Senior Dev, Member, Contributor). This is to easily communicate the team structure and roles to potential contributors.
Other Notes
About Milestones
Previously, we used milestones to help manage versions, adding a milestone to an issue once related PRs had been merged. However, there was confusion over the use of milestones and labels and adding a milestone was often forgotten. Hence, ultimately it was not sufficiently useful to the team.